20130411

YFBS: Day 4 - What the Flux

Over the next few days, I will be writing about my time at the Yamaguchi Frame Building School.  The first entry can be found here.  

First thing in the morning was more tower practice to prepare for some real brazing, and to warm up from the snow that had been falling in flurries outside.  My towers have improved quite a bit, both in appearance and strength (they passed the hammer test this time!) and I feel like I'm getting the rhythm of brazing.  After an hour of practice it was time for some serious work on the tubes for the main triangle.  


Noticed this frame this morning - look at how the down tube extends past the bottom bracket and hugs the wheel.  This is for aerodynamics - Mr. Yamaguchi tests his frames with riders in a wind tunnel! 
Explaining the difference in aligning lugged vs. lugless bottom bracket shells, Mr. Yamaguchi set up the alignment table and showed us what to look for: the drive side of the bottom bracket facing up and a clean fit with the seat tube.  In order for heat and vapor to escape when brazing the tubes, a small hole had to be drilled in the center of the BB shell, so we busted out the drill press.


Nicely drilled and dremmeled!
Now it gets serious: the next task was tacking the bottom bracket shell to the seat tube.  Using the same alignment table, Mr. Yamaguchi demonstrated tacking - a process in which a small dab of brass brazing is applied to hold the tubes in place.  Prior to brazing, everything must be completely sanded and cleaned with acetone so that the brazing will take.  Of course, Mr. Yamaguchi made the brazing look easy, gracefully applying the brazing material in small perfect drops to join the tubes.  


The surface, or alignment table.  Crucial to frame building, it's currently set up  to check our seat tubes against the bottom bracket and to tack them together.
We sanded down our own sets of tubes and bottom bracket shells, then one at a time began to tack.  Brazing requires lots and lots of flux, which is vital, but incredibly messy.  When it was my turn, I applied a liberal amount of flux and got to it.  I had problems on the first two sides, but the last side was easy, since it was the easiest to access on the table.  The tubes have to cool on the alignment table for a few minutes so that they will not warp, during which Mr. Yamaguchi demonstrated the next step: internal brazing.


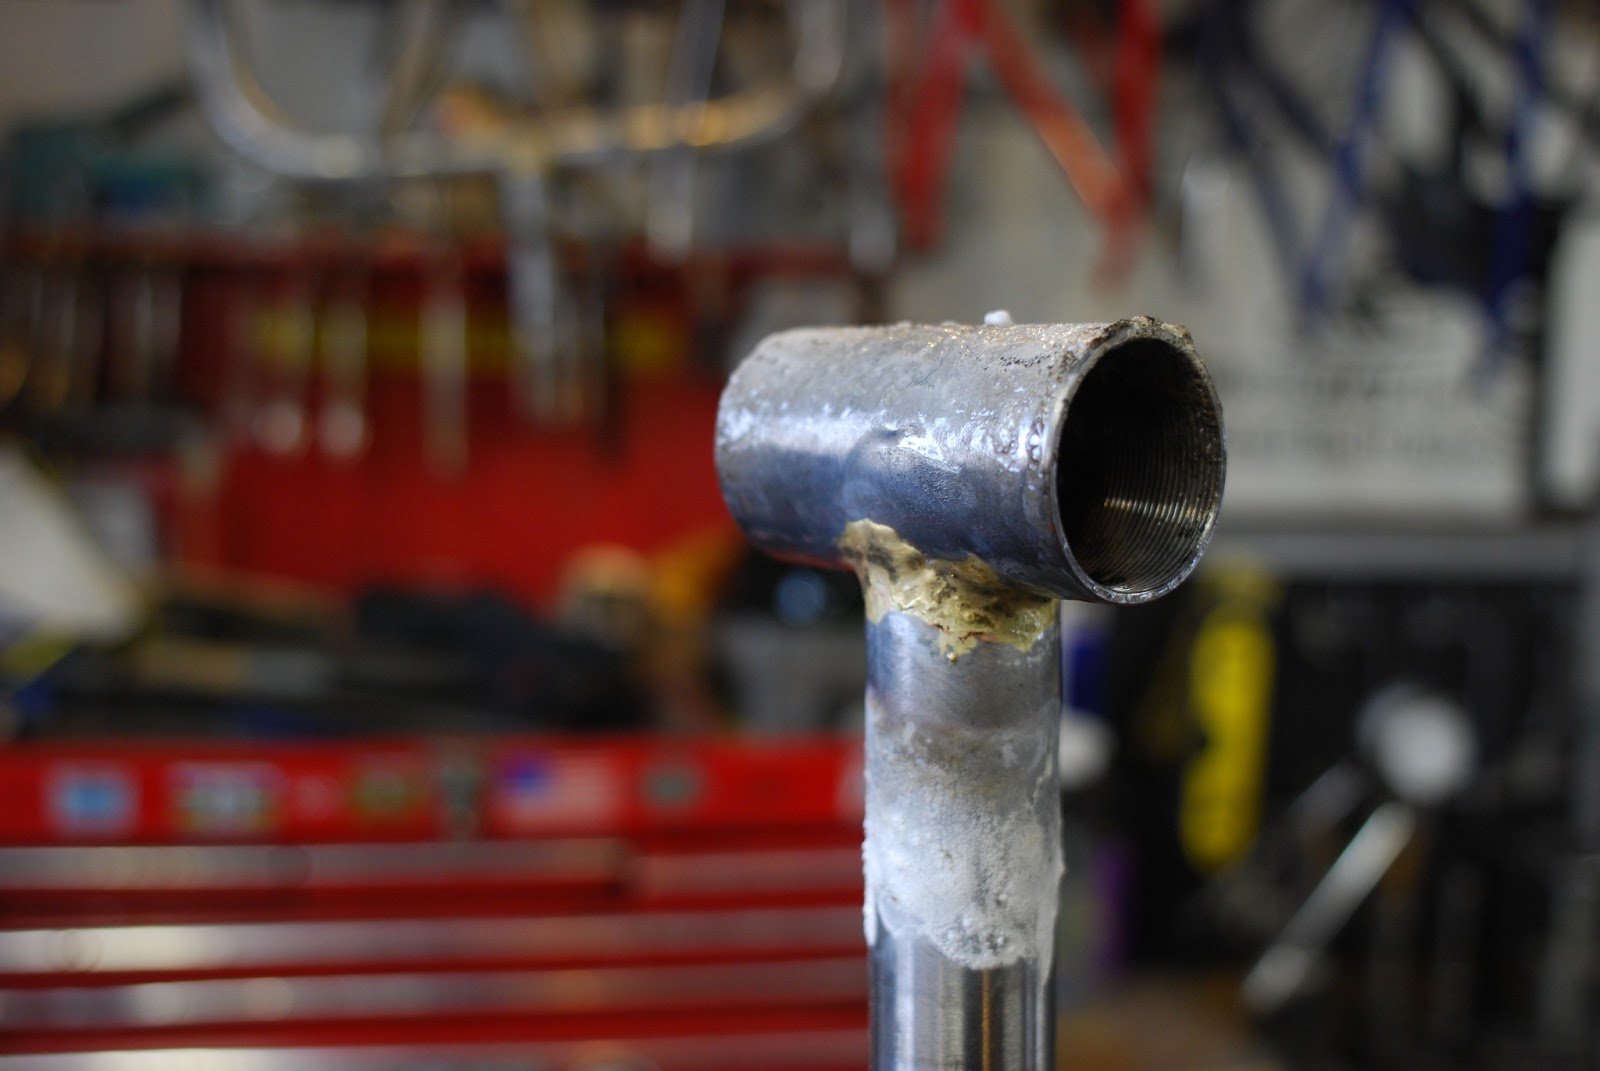
Currently tacked!  The white gunk is flux, or as Mr. Yamaguchi puts it: "Your best friend and your worst enemy."
The reason that many frames fail, he explained, was that brazing was only done on the outside.  The inside must also be reinforced, or the frame will fail shortly.  This is the reason that the GT frames of which Mr. Yamaguchi designed all failed within weeks.  The builders that produced them did not do internal brazing, and the frames couldn't take the stress.  Internal brazing is tricky, but neat to watch: starting in between two of the four tacking points, the tubes are heated outside and inside (the BB shell) until they're cherry red.  Then, brazing material is applied, and by heating the inside of the bottom bracket the braze is "sucked" inside the tubes.  This is possible because of the hole that was drilled in the bottom bracket shell, and a result of the air being moved through is a sound much like a flute.  Our internal brazing made a nice duet.  


Internally brazed.  It might not look like much, but the inside of the seat tube is now reinforced, guaranteeing the frame will be strong and the fillet brazed joints won't fail.
I applied about eight more pounds of flux and tried my hand at internal brazing.  It was cool to watch the brass getting pulled into the inside of the tube, and when I was done I checked to see how much brazing material I used (about 10.5 inches, a good amount).  You want to keep usage consistent from tube to tube, so that you can make sure all tubes have the same strength and are reinforced equally.


All of Mr. Yamaguchi's frames, stems, and handlebars are internally brazed and reinforced where possible.  He tells us that he is much more concerned with strength and stiffness than he is with weight.
Letting the tubes cool, the next step was to work more on the top tube.  This gets tricky, as the next miter needs to be exact, or the top tube won't be the right length.  The miter also has to be at the correct angle, and line up with the other miter at the opposite end of the tube.  No pressure or anything.  First though, to ensure accuracy, Mr. Yamaguchi showed us how to find the centerline.  


Checking the alignment of the top tube against the seat tube.
"You can use this $500 caliper system and this equation," he showed us, "or you can use a file with a level on it, and a right angle.  $40 solution." Holding a level on the flat side of a file, the top tube was aligned to the seat tube, and a centerline was made.  Then, the same thing was done on the sides, until the top tube had all the necessary centerlines.  Another template for the miter was cut and applied, and it was back to filing.


It might not look like much, but these tools and setup are absolutely crucial to a good frame.  One millimeter off, and the frame will not function or ride properly.  Precision is key.  
Lo and behold, I accidentally applied my template turned around.  Fortunately short after I started filing, Mr. Yamaguchi stopped me with an "Ahhhh!" and helped me correct my mistake.  This is why you always cut a bit longer - I had enough tube left that it wasn't going to ruin my frame.  I had another problem though, in that at some point I accidentally reset the protractor to 71 degrees instead of 73, throwing off the first miter on my top tube.  I had to correct this mistake before continuing, but on the bright side I'm pretty good at getting whatever angle I need to!

I was barely finished with my last miter (about a millimeter left) when it was time to call it a day.  Time flies when you're building frames, but working too long and getting tired can cause you to make small mistakes that can mess up the frame, so home we all went to rest up before tacking the rest of the main triangle tomorrow. 


Included just because Suntour Superbe Pro is awesome.  

No comments:

Post a Comment

Tell me your bike related thoughts!

Template developed by Confluent Forms LLC; more resources at BlogXpertise