It's funny how things go sometimes.
Four and a half years ago, I wrote a post with the same title as this one. It was nearly six months after I had moved from Los Angeles to the Bay Area to for a wonderful new job.
Today, I'm writing almost the exact same post.
I again left Los Angeles nearly six months ago to go after my dream job that I had always thought was so out of reach. But here I am.
I miss LA dearly. The cycling community there was the best I've ever seen, and the friends I made and places I rode are with me every day. I'm so fortunate that I got to spend an amazing summer riding with SWAT, tearing up Encino Velodrome, bombing Griffith Park and spending every Wednesday morning on the LA River Trail for Camp Coffee. It wasn't nearly long enough, but I'm so glad that I had it, even for such a short time.
Being back here in the bay is wonderful in its own way, and I am slowly starting to get back up and running. My little shop now exists, I am riding with a group of people at work, and starting to explore the hills of the east bay.
Sorry that I've been away - I've been too busy riding to update this little blog of mine. But, like I wrote last time I returned from Los Angeles, maybe I can change that again.
20170331
20160826
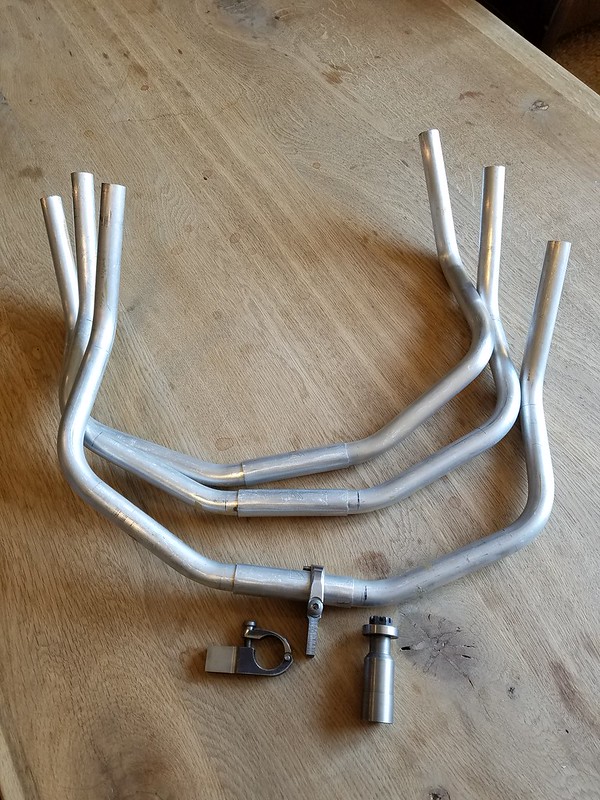
Super Quick Update
And then this finally happened.
To answer a few questions - no, they are not for sale. They are 25mm at the shim, so they will only fit with their proprietary clamps and won't work on other bikes, which is one of the reasons they are not for sale. I am not sure yet what will be built with them, but I have enough to do three frames with aero head tubes (see that steer tube? Yeah, that's a steer tube). They are awesome, but I do not think I can get or order anymore like this. Maybe.
That's all for now. I'm riding bikes a lot. Track bikes and road bikes. And building bikes. Bikesbikesbikes.
 |
| Whhhhhhaaaaaaat. |
That's all for now. I'm riding bikes a lot. Track bikes and road bikes. And building bikes. Bikesbikesbikes.
20160511
I need about ten more hours each day to get everything done
Or, maybe I can stop sleeping and instead update this sadly neglected blog that I have so much content but not nearly enough time for!
I am keeping Petrichor decently updated with photos, and Flickr also gets new things here and there since uploading from my phone can be done from just about anywhere. If things are quiet here, chances are I'm over there. Or, you know, dead.
Really, the reason I have no time to write about bikes is because my life has become nothing but bikes. Mostly riding them with rad people and building them, but also tinkering, buying and selling, and building up gems here and there.
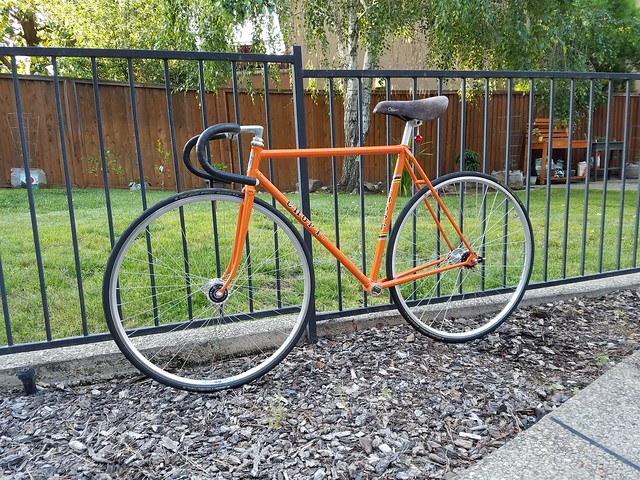
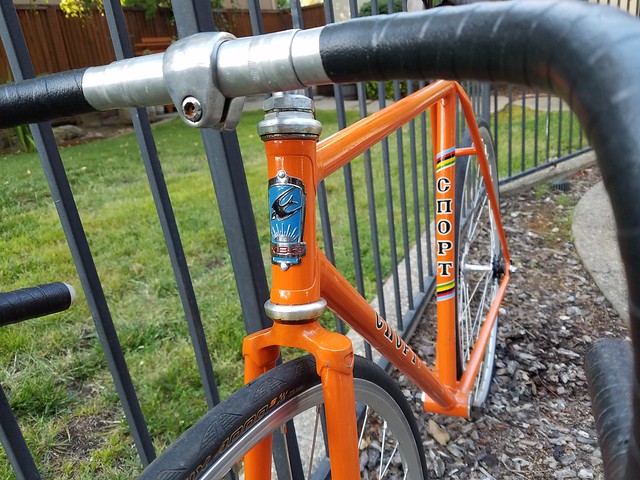
Like this awesome XB3 Sport that has become my new timeshare bike, or will once I give that BB an overhaul. Anyone ever seen an orange one of these before? All original parts, but orange. And tiny. It's like it was made for me.
I have a couple non half-assed posts drafted up that I need to get to. But know that things are awesome in my little bike world, and I couldn't be happier, which is why I haven't been around enough. Hopefully I'll manage my time a bit better in the future, but in the meantime if you see me riding around LA, say hi!
I am keeping Petrichor decently updated with photos, and Flickr also gets new things here and there since uploading from my phone can be done from just about anywhere. If things are quiet here, chances are I'm over there. Or, you know, dead.
Really, the reason I have no time to write about bikes is because my life has become nothing but bikes. Mostly riding them with rad people and building them, but also tinkering, buying and selling, and building up gems here and there.
Like this awesome XB3 Sport that has become my new timeshare bike, or will once I give that BB an overhaul. Anyone ever seen an orange one of these before? All original parts, but orange. And tiny. It's like it was made for me.
I have a couple non half-assed posts drafted up that I need to get to. But know that things are awesome in my little bike world, and I couldn't be happier, which is why I haven't been around enough. Hopefully I'll manage my time a bit better in the future, but in the meantime if you see me riding around LA, say hi!
20160324
On Humanity
A few days ago, a very close friend of mine was pulled over on the side of the road during San Jose Bike Party, changing a flat tire. He was minding his own business, wasn't obstructing traffic, and hadn't been riding recklessly - in fact, if there was a poster child for safe cycling, he would be it. At one point a car drove by and he was hit in the face by what he thought was a substantially sized rock that had been kicked out by the car's tires. He went to ER, and they scheduled him for an X-ray and possible reconstructive surgery.
It turns out, my friend - someone who I care deeply about - was shot. He was hit in the orbital socket with a lead bullet from an air rifle, with the only motivation seemingly being that he was on a bike and the motorist was unhappy with cyclists. Thankfully he's alive and in one piece, and didn't lose his eye, but the idea that someone would do such a thing to another human being is so strange and sad to me.
Whether you're a cyclist or a motorist, and whether one or the other occasionally inconveniences you for whatever reason, we are all people. Be it someone's son or someone's daughter, someone's husband or wife, someone's father or mother - the ten seconds you might be delayed is not worth the potential cost of someone's life.
And if you truly feel that someone is inconveniencing you to the point where you should cause them physical harm, perhaps you should take a good, long look at your life.
20160319
Fork Crown Cronicles: A Preview
Eons ago I cast two fork crowns.
I made two because it was recommended I make an extra just in case the first one failed. I didn't make more because I wanted to be certain that they would work before I sold any internal organs to produce a bunch. So the twin crown wasn't going to go to just anyone, it would have to go to someone special. And it did.
Today I was shown this photo, and initially it didn't even register.
That's my crown on that fork.
Needless to say, I'm psyched to see more of this Colnago, excited that a successful build came of my crown, and happy that it means more of these are coming in the future.
I guess I need to finish the frame that goes with the other crown...

I'm still torn though - fillet brazed, or lugged?
I made two because it was recommended I make an extra just in case the first one failed. I didn't make more because I wanted to be certain that they would work before I sold any internal organs to produce a bunch. So the twin crown wasn't going to go to just anyone, it would have to go to someone special. And it did.
Today I was shown this photo, and initially it didn't even register.
 |
| Image Via Hrrundel's Flickr. |
Needless to say, I'm psyched to see more of this Colnago, excited that a successful build came of my crown, and happy that it means more of these are coming in the future.
I guess I need to finish the frame that goes with the other crown...

I'm still torn though - fillet brazed, or lugged?
20160314
Out Riding. And Building.
I've been so busy with everything else bike related in my life, I've been neglecting this poor little blog!
Geez, over the past three months a lot has happened. Lets see...
- I have a frame currently being painted. Another is almost ready to go to paint.
- I found a lovely Takhion Aero that's actually my size! I tore my quadriceps tendon, so I'm off of fixed geared bikes for a while, but once it's healed I can take it to the track.
- I attended NAHBS, which filled me with inspiration and where I got to meet so many wonderful people!
- I met some other local framebuilders, who are rad and wonderful people.
- I met some other local cyclists through LA's Bikes and Coffee Camp, who are also rad and wonderful people.
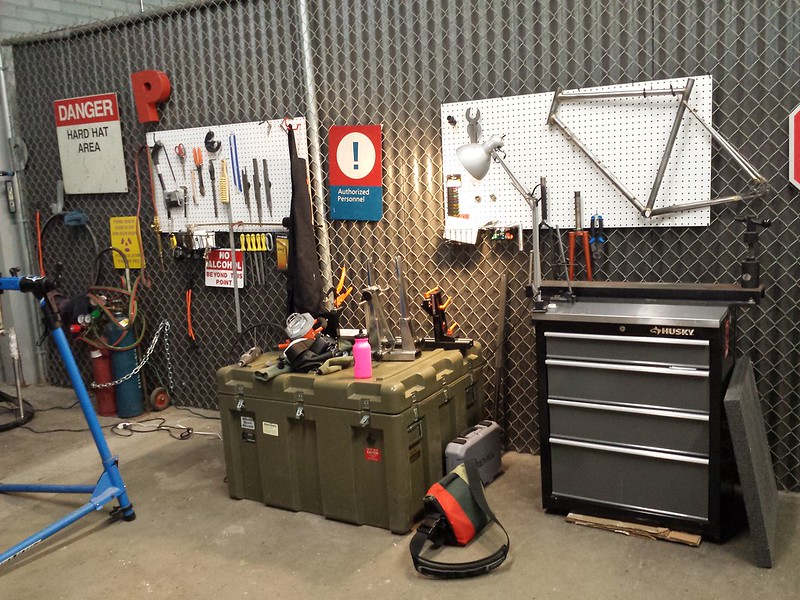
- The shop got an overhaul, and now it actually looks like a proper shop.
- I did the Solvang Century, which was my first century ever. My knee held up just fine, I kept a decent pace, and I love my bike more than ever.
I'm in the shop a lot these days, which I'm loving! If you're in LA and want to stop by, please let me know.
Subscribe to:
Posts (Atom)