Showing posts with label framebuilding. Show all posts

20160826

Super Quick Update

And then this finally happened.
Petrichor Pursuit Bars
Whhhhhhaaaaaaat.
To answer a few questions - no, they are not for sale.  They are 25mm at the shim, so they will only fit with their proprietary clamps and won't work on other bikes, which is one of the reasons they are not for sale.  I am not sure yet what will be built with them, but I have enough to do three frames with aero head tubes (see that steer tube?  Yeah, that's a steer tube).  They are awesome, but I do not think I can get or order anymore like this.  Maybe. 

That's all for now.  I'm riding bikes a lot.  Track bikes and road bikes.  And building bikes.  Bikesbikesbikes.  

20160319

Fork Crown Cronicles: A Preview

Eons ago I cast two fork crowns.

I made two because it was recommended I make an extra just in case the first one failed.  I didn't make more because I wanted to be certain that they would work before I sold any internal organs to produce a bunch.  So the twin crown wasn't going to go to just anyone, it would have to go to someone special.  And it did. 

Today I was shown this photo, and initially it didn't even register.

Image Via Hrrundel's Flickr.
 That's my crown on that fork.  

Needless to say, I'm psyched to see more of this Colnago, excited that a successful build came of my crown, and happy that it means more of these are coming in the future.

I guess I need to finish the frame that goes with the other crown...


I'm still torn though - fillet brazed, or lugged?

20160314

Out Riding. And Building.

I've been so busy with everything else bike related in my life, I've been neglecting this poor little blog!

Geez, over the past three months a lot has happened.  Lets see...

- I have a frame currently being painted.  Another is almost ready to go to paint.

- I found a lovely Takhion Aero that's actually my size!  I tore my quadriceps tendon, so I'm off of fixed geared bikes for a while, but once it's healed I can take it to the track.


- I attended NAHBS, which filled me with inspiration and where I got to meet so many wonderful people!  

- I met some other local framebuilders, who are rad and wonderful people.

- I met some other local cyclists through LA's Bikes and Coffee Camp, who are also rad and wonderful people.  

- The shop got an overhaul, and now it actually looks like a proper shop.  


- I did the Solvang Century, which was my first century ever.  My knee held up just fine, I kept a decent pace, and I love my bike more than ever.  

I'm in the shop a lot these days, which I'm loving!  If you're in LA and want to stop by, please let me know.  

20151229

NAHBS!

Tickets are bought, and it's official - I'll be going to NAHBS this year!

I certainly won't have a booth or anything like that, but I am definitely excited to see what's new in the framebuilding world and finally meet some of the many builders that I follow in person.  I cannot wait!

I hope that everyone had a good holiday and is currently enjoying this strange week that always happens between Christmas and New Year's. 

Bike Santa was good to me this year.
Time to prep for New Year's festivities...

20150618

On Petrichor

It was long before I started this blog that I knew I wanted to learn to build frames someday.  

I remember staring at my laptop screen after going down a rabbit hole of bikeforum links and ending up at the page for the Yamaguchi Frame Building School.  I knew then that I would take that class someday, and from that day on I started to daydream about what it would be like to build my own frames.  I knew nothing about what it entailed, nothing about geometry, very little about tubing, and almost nothing about the time and care that went in to building and designing a frame.  In my daydreams, I tried to come up with what I would call my frames.  There were a few ideas that came and went, but Petrichor was the one that seemed to stick.  

It seemed I wasn't the only one that had this idea, and that's why I am writing this post today.  I filed for the trademark of Petrichor Frames nearly a year ago, and shortly after I learned that the name was being used in the form of Petrichor Cycles by a man in Europe.  I was mostly upset with myself that I hadn't discovered this before - I had done research on the name back in 2011 (which are the earliest documented records I have of wanting to use the name) and hadn't found anything, and after taking the class in 2013 I began a the long, arduous, and ridiculous process of trying to get a business license under the name.  It took a year and a half, countless paperwork, more money than I should have spent (and then some) to finally be granted a business license.  Once I got it, I filed for a trademark.  After all of this, I discovered the name was being used.  

I ended up contacting the owner of Petrichor Cycles and explaining myself and the situation.  I found out that he's a pretty cool guy, and also that what we're doing is drastically different as far as the cycling world goes.  He is making mass produced frames, while I'm doing mostly 3D work and making a few custom frames when I can.  Basically, if he were a high end coffee shop, I'm the person with a salvaged espresso machine making drinks for my friends in the basement on Saturday nights.  He agreed that what we were working on was different enough, and since we're on different sides of the world serving different groups of people, we decided to keep each other posted on what was going on.  

A few days ago, the trademark for Petrichor Frames was approved, though I have declined to extend the trademark to any European countries.  That said, owning the trademark means that you own it for life.  Had I been declined the trademark, I would have gone through the process of starting to change the name, as I would have had a legal reason that I could present to undergo that process.  However, in the meantime, I am going to keep the name.  It's been an uphill battle for me to start this little business and to get to where I am today, and I want to stay where I am for a while.  

I don't consider myself a great builder, and I most likely never will.  The idea of getting a business license and a trademark was mostly born out of my desire to sell things like the Takhion caps legally, which I decided to extend over to frames, repair work and restoration because I'm a sucker for playing by the rules.  I work 45 hours a week at my "day job," and my tiny business venture is something that is reserved for weekends or rare days where I get in and out of work early.  But I love doing this, I genuinely from the bottom of my heart find joy in this.  Maybe someday I'll get to do it full time.  If it comes to that point, perhaps things will change.

I completely understand if this changes your opinion of me, but I wanted to be up front with everyone who reads this blog.  I certainly wasn't trying to tread on anyone's territory, or be a jerk, or anything of the sort.  

20150601

I'M BAAAAAAACK

Ta-daaaaa I need more work benches.
I was feeling a bit funky on Sunday, but nevertheless I decided to take some time to get the shop up and running.  It was a lot of pulling boxes back and forth and unpacking them, but it's starting to look like an actual place where bikes are made.

I still have to pick up the tanks, and I have so much space (about three times as much as before) that I have no idea what to do with it all.  I suppose I will be scouring garage sales for more workbenches and tool storage.  

My new space is much more, uh, legit than my old place.  My neighbors consist of welders, a blacksmith, woodworkers and sculptors, so I have a lot of really knowledgeable people near me.  Also, this space is wired for 220!  Perhaps TIG is in my future.  

20150208

Finally, I Think

It's hard to believe it, but this frame is ready for paint.

Also, the wheel fits, which is nice.
I've been working on this frame for long it's definitely hard for me to fathom.  The alignment is checked, the finishing work is done - the last, last thing it needs is some tapping and facing goodness that I don't have the tools to do.  This is as far as I can go.  It's weird, and awesome.

I'll have to borrow the tools to do the BB facing and headset facing/reaming, and then this one is getting a nice green powder coat with some white decals.  I am really excited to see how it will turn out! 

Yes, I still have to make the fork, but let me enjoy the fact that I managed to finish the main frame for a while before moving on to that :]

20150207

More Fork Progress

Last weekend I did some reinforcing of this fork with brass fillets to make a smoother transition between the crown and the blades and to strengthen the fork overall.

Sturdy.
There's one small area that I want to add a bit more material to, but so far it's looking like this test fork is pretty much in the bag.  

I also put the finishing touches on the touring frame last week, which included three sets of water bottle bosses.  

I'm getting better with temperature control during silver brazing.  It's not covered in char this time!
It's really weird to think this frame is almost done.  I might be able to take it for paint fairly soon.  Amazing what having working welding equipment does for productivity!  

20150125

Fork Crown Chronicles: Lets see if this works!

My goal for today was to test the crowns to see if they fit properly in the jig, fit properly with fork blades and a steer tube, and didn't explode when I tried to braze them.  

Surprisingly, it was fine!  
The jig test went perfectly, but let me back up a minute.  One of the other things I was looking forward to testing was the strength of the steel.  I'm used to how the tubing and brass feels when I'm working with it, but I wasn't sure what to expect from the castings.

Holy crap, these things are bombproof.  

This is definitely the hardest material I've ever worked with.  Not only does it take an insanely long time to file or sand down (it took three hours to bore out the center for the steer tube...by two millimeters) it also wore out multiple dremel sandpaper things and is pretty much immune to my shop roll.  This metal is not messing around - I'm not at all worried about the strength.  

Next was tacking and brazing.  Not meant to be pretty, just meant to check capabilities and all that fun stuff.

Silver flux is my enemy.
 The metal brazed well, and despite it's hardness didn't take overly too long to heat up.  I was able to do the dropouts and the blades, but the steer tube is just hanging out, though it's in there tight enough that it's not going anywhere.  

It's like a monolith
Brazing was like brazing any lug or dropout - nothing weird or out of the ordinary.  I whorked together a pretty basic fork without any problems, which is definitely a good sign.  The longest part of the process was honestly all of the machining.  

Full fork!
So far, everything is working nicely.  Next week I'll try adding a crown race and seeing what everything looks like then.  The dummy axle will hang out a bit until this test is finished.

Add caption
I sort of made a pseudo Takhion fork today.  Today was a good day.  

20150120

Fork Crown Chronicles: The first (steel) prototypes

:D
It's a bummer that I won't get these in the shop until Saturday, but I'm psyched to have them in hand!  They look great, but definitely need somme work.  Here's what I've noticed so far:

Machining: these guys need a lot of it.  There are printing marks (visible in the photos) and the tolerances from the casting and printing was a bit off.  I had to do some filing to allow the clamps to fit.  Other than that, I think some smoothing and possibly lathe work will solve everything.

Profile.  You can see some of the rough edges a bit better here.
Clamps: better ones are in the works.  These look nice, but I'd rather have them closer to the Takhion style clamps so that they could be interchangeable.

I made fork crowns!  That's super neat!
Weight: these guys are much heavier than my test crown.  I haven't put them on a scale yet, but I'll need to see what I can do to get the weight down.  They're made from 4130 steel, so they are strong!  That said, they also have the extra weight from the clamps to account for, so maybe this is a non-issue.

They'll need to be tapped.  That's not too bad, thankfully.  

"WE'RE HUGGING"
The rest will be tested on Saturday.  I can certainly get them polished and looking a lot prettier than this, so I'm not worried about anything thus far.  And I won't be the only one doing testing - one of these is going to a friend of mine who will be helping me iron out any kinks that I might find along the way!

20150114

It's Happening

The awesome casting company I am working with just sent me this.

It's REEEAAAAAAL!!
Two have been shipped to me to test, and I'll post updates as soon as I have them in hand!!  
Clamps are currently also being produced - there's the 3D printed option, but there's also something else in the works...

20141123

Finishing

Today I was greeted by a nearly empty acetylene tank.

It was well over 250 when I left last time.
If a tank is leaking, it's extremely dangerous and should be taken care of immediately!  Fortunately the warehouse that I am in is a massive, non-enclosed space and there are no ignition sources, so I removed the regulator and checked the tank.  Looks like the tank itself is fine, which is good news...but also means I need to get my regulator repaired, as it's the culprit.  My oxygen regulator is already out for repair, so at this point I might just throw in the towel and buy a new set.

Because I couldn't do any brazing, I spent the day finishing.  There are still some areas with pits that I need to fix, but I was able to at least start to smooth out the fillets and remove some extra brazing material.

Getting there!
This one was far easier to finish than the bottom bracket.
Head tube!  Here you can see some small pits that need to be filled in.  All the more reason for me to continue to practice!
Overall, I managed to at least get a rough finish on almost everything, and will do final polishing once I've brazed the problem areas and done the last few braze ons.  It's been slow, but I'm getting there.

20141112

STLs and IGESs and POs, oh my

If you're wondering why I've been so quiet the past few days, it's because I'm largely in the boring part of this project.  I have one new photo that mostly shows off the smooth clamps, which is this:

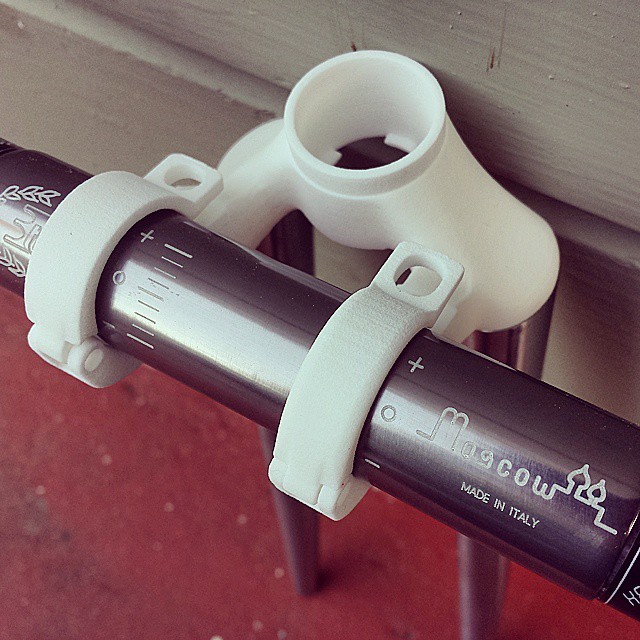
New clamp front and center!  Notice how it's much smoother than the other clamp, and has a wider area for some bolt wiggle room.
The rest of this is going to be quite technical and with no pictures, but it's been quite interesting to learn about, so maybe it can help anyone out there who's looking to investment cast their own bike parts.

Theoretically, once I printed this in 3D it should have been fairly easy to move to casting - right?  That sounds reasonable enough.  

I was wrong.  I was very wrong.  Let me tell you why.  

1) Casting in steel is not something people tend to do in their homes
I had been hoping to find a local artist who can make these.  A surprising number of people have forges in their backyards (or basements!) and they cast their own things in pewter, bronze, etc.  Steel, however, requires a much higher temperature and isn't really a home based hobby type deal...I'm sure there are people in the world that can do it, but my hunting around resulted in nothing.  So I started e-mailing casting companies.

2) Most places require you to make the tooling
When I reached out to casting companies, many required you to pay to make the mold to pour the wax in - only a select few let you either supply the wax models, or can print the wax models on site.  A typical mold runs anywhere from one to twenty five....thousand dollars.  

3) Most places have a large minimum order
Once I was able to find places that allowed me to supply my own wax castings, I had to find one that would allow for prototypes to be made.  $50 a crown is a pretty sweet deal, but a minimum order of 100 was not something I could handle.  

4) Wax prints have a maximum size limit
Once I found an awesome company that would let me supply wax, I went to get some wax prints made and sent their way...only to discover many wax printing machines, like the ones used by Shapeways, have a max size limit.  My crown was too big!  I went back to speak to the company about whether or not they could 3D print in wax (fortunately, they could!).  Were this not the case, I would need to find another company that could print in wax - and they do exist, it's just another step - and have them provide the prints.

5) Files don't always play nicely together
The file format I'm used to working with, and used to submitting for prints anyway, isn't something that many industry level professional printers can read.  Most larger companies use something like Solidworks for precision, and I was working with an obj format.  Trying to convert an obj to an IGES file with open source software is a nightmare, so if you can work in Solidworks right off the bat...do it!!

After all of this, however, I can happily say that casting of steel prototypes is in the works!  They should take about a month to be complete, and I'm keeping my fingers crossed that they come out smoothly.  

I've learned a ton about this process, but it's by no means scared me away from future castings.  The people that have helped me have been amazing, and I'm really hoping to continue doing business with them in the future for more fork crowns and other related framebuilding parts.  The possibilities are endless!  

20141014

Headbadge Test Has Arrived!!

I have to apologize for being absent the past few weeks.  My regulator has again decided to throw in the towel, and I was waiting on the second test print of the Takhion fork crown to arrive.  With that shipment was another little test that I whipped up: a 3D printed headbadge.

Shown here on the top tube...it fits the headtube, I promise!
It's a bit small at the moment, but it fits the headtube nicely.  The plan is to get each one custom printed depending on the frame: some might be printed in steel and brazed on, while others will be printed in whatever metal is desired (and or matches the color scheme) and then adhered.  

The explanation behind the badge is that it's a reference to the weather symbol for nimbostratus clouds - dark, low lying clouds which have light to medium precipitation.  I wanted a design that would be easy to incorporate both the build itself and the paint, so I started using this as my logo of sorts some time ago.  Nothing is set in stone, so it might change in the future, but in the meantime I've become quite attached to it!

Once I can get back into the shop I'll test fork crown v2, and fingers crossed I'll get to move on to the actual casting stage!

20140921

Testing, Testing

I was able to put the crown to an actual test this weekend.

Put on the jig to test blade placement.  
This is a very rough quick test to make sure that the fork blades and steer tube fit in the crown (which they do - hooray!!).  What you see on the jig is a bit deceiving, as the crown was not automatically this perfect.  The material that this is printed in is flexible, and well...

Unless 80mm axles become a thing, this isn't going to fly.
I had forgotten to account for the angling out of the blades.  This is why I test things!

Also the jig shows the blades raked, whereas here you can see they're perfectly straight.  For this crown, the blades will have to be bent by hand, though I also have a version in the works that will allow for straight blade forks. 

Everything been adjusted and fixed in the model, and for the crown base it was mostly angles that I had to work on.  The clamps were a different story, and I had to make a lot of changes based on feedback (thanks Hrrundel!) but now they're a lot better looking and far more functional.  I'm going to do another check of the model and then send out a new iteration to print!

20140915

Takhion Fork Crown: Print 1!!

Well this is certainly exciting:

I really need a lightbox.
The first print of this arrived today, and it's pretty cool to be able to see and hold the real print after staring at it on a screen for so long! 

With working clamps!  
This rough print still needs to have its measurements checked and compatibility with fork blades tested, and once it's approved it will be wax printed for casting.  Unfortunately I won't be able to test it with fork blades until this coming weekend, but everything else can be checked and fixed before then.

The model is missing the textured edges that the original Takhion fork had.  I'm still trying to figure out if I'll put them in the final model or if it will be smooth.  
Only one clamp was printed because they're interchangeable, and these things are not the cheapest to print.  This particular crown was modeled to fit standard Takhion bars, but I still wanted to test them with 3TTT bars just to make sure things were lining up.

Success!
The final casts will be tapped for a bolt and have hinges installed in the clamps.  The upper clamps themselves will probably be 3D printed in stainless steel.

Passing the 3TTT test with flying colors.
This particular print is done with Shapeways' strong and flexible plastic for testing purposes.  It's based off of a Takhion crown, but the dimensions were referenced from a spare fork crown I had purchased from Nova Cycles.  The clamps have been slightly modified from the original Takhion clamps, but I want to try to have a version of those available to purchase in steel for those that need them.  

20140906

Takhion Fork Crown Recreation: Rough Model Done!

So one of the reasons that I haven't been posting too much is that I was trying to finish this crazy thing, which every time I thought would go a lot faster reminded me that "hey, you're not a modeler" and then I'd start over.

So after more than a month of pushing around verts and sliding edges to get the perfect measurements, I have this to show for it:

Complete with clamps and everything!
This was modeled after a few Takhion forks and a spare fork crown I had lying around.  It's modeled to scale, and also currently modeled to accept 26mm Takhion handlebars.  

The main reason that I decided to do this is because I was curious about investment casting, and how cool it would be if I could design my own crowns and lugs and such and get them cast for framebuilding.  So, this will be my test.

A rather exciting side view. 
A sample crown model and a sample clamp model have both been sent to Shapeways for a test print.  Once these have proven to work the way I want them to, I plan to cast the crown base and possibly print the clamps in some nifty metal.  

There are a lot of factors that need to be tested with this crown - like, hey, will the fork blades fit?  Could it be drilled for brakes?  And so on.  I imagine this will be the first of many, many iterations to get everything just so.  The nice thing about working in 3D is that it's easy to measure things down to the tenth of a millimeter, and things can automatically stay symmetrical as you're working on them.  

Nope.  No brake holes.
I'm excited to see if this works, and what sort of possibilities it opens up if it does.  There are already builders out there successfully working with 3D printed lugs, and if they can do it, why not me?

20140720

Brazin'

After obtaining a loaner regulator while mine gets sent back to Craftsman for repair, I was able to do some external brazing.

I'm still fighting with temperature control a bit, but I feel like each time I pick up the torch I get a little better.  

Head tube fillet!
These dropouts were so thick it was difficult to heat them without overheating the chain and seat stays.  
Figuring out how to miter these by hand was interesting.
Bottom bracket, and a nice view of the fancy bent chainstays!
Suddenly, a bicycle.
Having the loaner regulator seemed to make a huge difference - I think my oxygen regulator wasn't really doing a great job of, well, regulating.  Hopefully when I get it back it will work just as nicely as this one.  

Once I clean up the flux, I'll double back and fix any holes or weird areas on the fillets.  Then it's time for braze ons!  

20140621

A Day of Stays

Sorry for my silence lately!  

Today I spent a good chunk of time in the shop working on the chain stays and the seat stays for the touring frame.  

When I was working on stays at the Yamaguchi Frame Building School Mr. Yamaguchi had a few nifty tricks to deal with stays.  However, this current bike is a bit tricky and is using bent chain stays, so I had to do a bit of magic to get things to work.  And by magic I mean math: I calculated the angle of the chain stays and then mitered them accordingly, making sure that I kept the amount of material removed consistent on both sides.

We have a stay!
Once the stays were mitered, I had to slot the other ends to fit the dropouts, which took approximately forever.  The only file I had to do this was a low quality file that I hadn't yet replaced with a Nicholson file...and I definitely learned my lesson!  

Now it's really starting to look like a bike!
I still need to crimp the drive side chain stay, thought I did mark and measure with the crank that will go on this bike so that I have a good point of reference.  
The seat stays are about halfway done, but I need a better file before I attempt to slot them.  Once they're good to go the rear triangle will be tacked, which means final brazing and the (many) braze-ons are coming soon...

20140603

Action Shots

These goggles make me look like some sort of evil mad scientist...


Stefen of Sprocket was kind enough to snag these photos when I was doing some brazing on the seat tube.  
Template developed by Confluent Forms LLC; more resources at BlogXpertise