Showing posts with label 3D. Show all posts

20150125

Fork Crown Chronicles: Lets see if this works!

My goal for today was to test the crowns to see if they fit properly in the jig, fit properly with fork blades and a steer tube, and didn't explode when I tried to braze them.  

Surprisingly, it was fine!  
The jig test went perfectly, but let me back up a minute.  One of the other things I was looking forward to testing was the strength of the steel.  I'm used to how the tubing and brass feels when I'm working with it, but I wasn't sure what to expect from the castings.

Holy crap, these things are bombproof.  

This is definitely the hardest material I've ever worked with.  Not only does it take an insanely long time to file or sand down (it took three hours to bore out the center for the steer tube...by two millimeters) it also wore out multiple dremel sandpaper things and is pretty much immune to my shop roll.  This metal is not messing around - I'm not at all worried about the strength.  

Next was tacking and brazing.  Not meant to be pretty, just meant to check capabilities and all that fun stuff.

Silver flux is my enemy.
 The metal brazed well, and despite it's hardness didn't take overly too long to heat up.  I was able to do the dropouts and the blades, but the steer tube is just hanging out, though it's in there tight enough that it's not going anywhere.  

It's like a monolith
Brazing was like brazing any lug or dropout - nothing weird or out of the ordinary.  I whorked together a pretty basic fork without any problems, which is definitely a good sign.  The longest part of the process was honestly all of the machining.  

Full fork!
So far, everything is working nicely.  Next week I'll try adding a crown race and seeing what everything looks like then.  The dummy axle will hang out a bit until this test is finished.

Add caption
I sort of made a pseudo Takhion fork today.  Today was a good day.  

20150120

Fork Crown Chronicles: The first (steel) prototypes

:D
It's a bummer that I won't get these in the shop until Saturday, but I'm psyched to have them in hand!  They look great, but definitely need somme work.  Here's what I've noticed so far:

Machining: these guys need a lot of it.  There are printing marks (visible in the photos) and the tolerances from the casting and printing was a bit off.  I had to do some filing to allow the clamps to fit.  Other than that, I think some smoothing and possibly lathe work will solve everything.

Profile.  You can see some of the rough edges a bit better here.
Clamps: better ones are in the works.  These look nice, but I'd rather have them closer to the Takhion style clamps so that they could be interchangeable.

I made fork crowns!  That's super neat!
Weight: these guys are much heavier than my test crown.  I haven't put them on a scale yet, but I'll need to see what I can do to get the weight down.  They're made from 4130 steel, so they are strong!  That said, they also have the extra weight from the clamps to account for, so maybe this is a non-issue.

They'll need to be tapped.  That's not too bad, thankfully.  

"WE'RE HUGGING"
The rest will be tested on Saturday.  I can certainly get them polished and looking a lot prettier than this, so I'm not worried about anything thus far.  And I won't be the only one doing testing - one of these is going to a friend of mine who will be helping me iron out any kinks that I might find along the way!

20150114

It's Happening

The awesome casting company I am working with just sent me this.

It's REEEAAAAAAL!!
Two have been shipped to me to test, and I'll post updates as soon as I have them in hand!!  
Clamps are currently also being produced - there's the 3D printed option, but there's also something else in the works...

20141112

STLs and IGESs and POs, oh my

If you're wondering why I've been so quiet the past few days, it's because I'm largely in the boring part of this project.  I have one new photo that mostly shows off the smooth clamps, which is this:
New clamp front and center!  Notice how it's much smoother than the other clamp, and has a wider area for some bolt wiggle room.
The rest of this is going to be quite technical and with no pictures, but it's been quite interesting to learn about, so maybe it can help anyone out there who's looking to investment cast their own bike parts.

Theoretically, once I printed this in 3D it should have been fairly easy to move to casting - right?  That sounds reasonable enough.  

I was wrong.  I was very wrong.  Let me tell you why.  

1) Casting in steel is not something people tend to do in their homes
I had been hoping to find a local artist who can make these.  A surprising number of people have forges in their backyards (or basements!) and they cast their own things in pewter, bronze, etc.  Steel, however, requires a much higher temperature and isn't really a home based hobby type deal...I'm sure there are people in the world that can do it, but my hunting around resulted in nothing.  So I started e-mailing casting companies.

2) Most places require you to make the tooling
When I reached out to casting companies, many required you to pay to make the mold to pour the wax in - only a select few let you either supply the wax models, or can print the wax models on site.  A typical mold runs anywhere from one to twenty five....thousand dollars.  

3) Most places have a large minimum order
Once I was able to find places that allowed me to supply my own wax castings, I had to find one that would allow for prototypes to be made.  $50 a crown is a pretty sweet deal, but a minimum order of 100 was not something I could handle.  

4) Wax prints have a maximum size limit
Once I found an awesome company that would let me supply wax, I went to get some wax prints made and sent their way...only to discover many wax printing machines, like the ones used by Shapeways, have a max size limit.  My crown was too big!  I went back to speak to the company about whether or not they could 3D print in wax (fortunately, they could!).  Were this not the case, I would need to find another company that could print in wax - and they do exist, it's just another step - and have them provide the prints.

5) Files don't always play nicely together
The file format I'm used to working with, and used to submitting for prints anyway, isn't something that many industry level professional printers can read.  Most larger companies use something like Solidworks for precision, and I was working with an obj format.  Trying to convert an obj to an IGES file with open source software is a nightmare, so if you can work in Solidworks right off the bat...do it!!

After all of this, however, I can happily say that casting of steel prototypes is in the works!  They should take about a month to be complete, and I'm keeping my fingers crossed that they come out smoothly.  

I've learned a ton about this process, but it's by no means scared me away from future castings.  The people that have helped me have been amazing, and I'm really hoping to continue doing business with them in the future for more fork crowns and other related framebuilding parts.  The possibilities are endless!  

20141014

Headbadge Test Has Arrived!!

I have to apologize for being absent the past few weeks.  My regulator has again decided to throw in the towel, and I was waiting on the second test print of the Takhion fork crown to arrive.  With that shipment was another little test that I whipped up: a 3D printed headbadge.

Shown here on the top tube...it fits the headtube, I promise!
It's a bit small at the moment, but it fits the headtube nicely.  The plan is to get each one custom printed depending on the frame: some might be printed in steel and brazed on, while others will be printed in whatever metal is desired (and or matches the color scheme) and then adhered.  

The explanation behind the badge is that it's a reference to the weather symbol for nimbostratus clouds - dark, low lying clouds which have light to medium precipitation.  I wanted a design that would be easy to incorporate both the build itself and the paint, so I started using this as my logo of sorts some time ago.  Nothing is set in stone, so it might change in the future, but in the meantime I've become quite attached to it!

Once I can get back into the shop I'll test fork crown v2, and fingers crossed I'll get to move on to the actual casting stage!

20140921

Testing, Testing

I was able to put the crown to an actual test this weekend.

Put on the jig to test blade placement.  
This is a very rough quick test to make sure that the fork blades and steer tube fit in the crown (which they do - hooray!!).  What you see on the jig is a bit deceiving, as the crown was not automatically this perfect.  The material that this is printed in is flexible, and well...

Unless 80mm axles become a thing, this isn't going to fly.
I had forgotten to account for the angling out of the blades.  This is why I test things!

Also the jig shows the blades raked, whereas here you can see they're perfectly straight.  For this crown, the blades will have to be bent by hand, though I also have a version in the works that will allow for straight blade forks. 

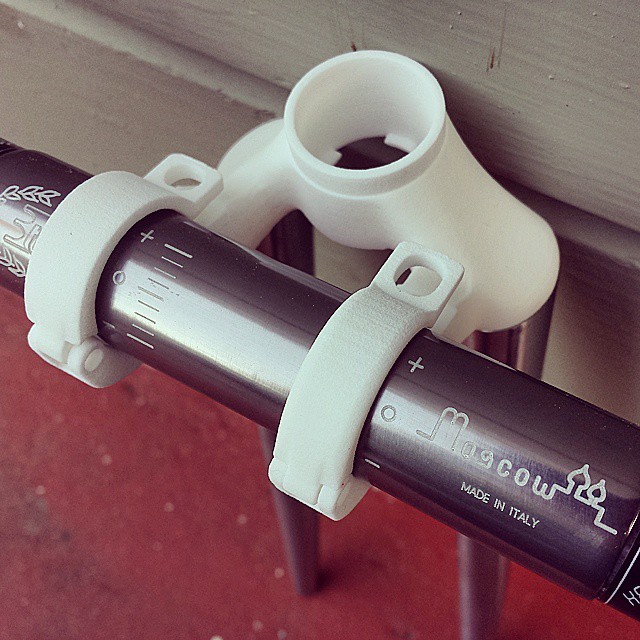
Everything been adjusted and fixed in the model, and for the crown base it was mostly angles that I had to work on.  The clamps were a different story, and I had to make a lot of changes based on feedback (thanks Hrrundel!) but now they're a lot better looking and far more functional.  I'm going to do another check of the model and then send out a new iteration to print!

20140915

Takhion Fork Crown: Print 1!!

Well this is certainly exciting:

I really need a lightbox.
The first print of this arrived today, and it's pretty cool to be able to see and hold the real print after staring at it on a screen for so long! 

With working clamps!  
This rough print still needs to have its measurements checked and compatibility with fork blades tested, and once it's approved it will be wax printed for casting.  Unfortunately I won't be able to test it with fork blades until this coming weekend, but everything else can be checked and fixed before then.

The model is missing the textured edges that the original Takhion fork had.  I'm still trying to figure out if I'll put them in the final model or if it will be smooth.  
Only one clamp was printed because they're interchangeable, and these things are not the cheapest to print.  This particular crown was modeled to fit standard Takhion bars, but I still wanted to test them with 3TTT bars just to make sure things were lining up.

Success!
The final casts will be tapped for a bolt and have hinges installed in the clamps.  The upper clamps themselves will probably be 3D printed in stainless steel.

Passing the 3TTT test with flying colors.
This particular print is done with Shapeways' strong and flexible plastic for testing purposes.  It's based off of a Takhion crown, but the dimensions were referenced from a spare fork crown I had purchased from Nova Cycles.  The clamps have been slightly modified from the original Takhion clamps, but I want to try to have a version of those available to purchase in steel for those that need them.  

20140906

Takhion Fork Crown Recreation: Rough Model Done!

So one of the reasons that I haven't been posting too much is that I was trying to finish this crazy thing, which every time I thought would go a lot faster reminded me that "hey, you're not a modeler" and then I'd start over.

So after more than a month of pushing around verts and sliding edges to get the perfect measurements, I have this to show for it:

Complete with clamps and everything!
This was modeled after a few Takhion forks and a spare fork crown I had lying around.  It's modeled to scale, and also currently modeled to accept 26mm Takhion handlebars.  

The main reason that I decided to do this is because I was curious about investment casting, and how cool it would be if I could design my own crowns and lugs and such and get them cast for framebuilding.  So, this will be my test.

A rather exciting side view. 
A sample crown model and a sample clamp model have both been sent to Shapeways for a test print.  Once these have proven to work the way I want them to, I plan to cast the crown base and possibly print the clamps in some nifty metal.  

There are a lot of factors that need to be tested with this crown - like, hey, will the fork blades fit?  Could it be drilled for brakes?  And so on.  I imagine this will be the first of many, many iterations to get everything just so.  The nice thing about working in 3D is that it's easy to measure things down to the tenth of a millimeter, and things can automatically stay symmetrical as you're working on them.  

Nope.  No brake holes.
I'm excited to see if this works, and what sort of possibilities it opens up if it does.  There are already builders out there successfully working with 3D printed lugs, and if they can do it, why not me?

20140728

Takhion Bar Plugs: The Second Prototypes

It's only taken me a year...

Original orphan bar plug on the left, and the reproduction on the right.  
I just got the latest prototype tonight and snapped some photos before it got too dark.  Unfortunately I wasn't quite fast enough and didn't get one of the plug actually in the handlebars - but it does fit!  Perfectly!

There are a few small changes that need to be made, some of which are visible in the photos.  I instanced the original Takhion logo from the headset cap model, which needs to be adjusted a bit.  The diameter of the top can be increased and deepened by a millimeter, and I need to re-check the proportions of the circles surrounding the logo.  Small changes, but they'll make all the difference and can be done quickly.  The next iteration should be the last!

For those of you wondering about plugs that support cables: once these pass inspection I'll modify the model to allow for brake cables.  

It's really hard to get a good focus on these tiny details.
If all goes well, these will be for sale sometime in August!

20140713

Coming Soon To Pursuit Bars Near You

I went to do some final brazing this weekend and discovered that my oxygen regulator had decided "nah."  Since Amazon doesn't consider oxygen regulators worthy of same day delivery service quite yet (apparently that's reserved for "essentials," like "food") I figured I'd tackle another project that's been getting finished way too slowly over these past few weeks.

Disregard the funky artifacting.
This is undergoing a test print at the moment, and after any additional edits I'll make the modifications for cable routing.  Hopefully I can have these for you guys by the end of summer! 

20140530

Takhion Headset Caps: Now Available!!

One year and four prototypes later, I can happily say that replacement Takhion headset caps are now available!  


Old cap on the left, new cap on the right.
So, because a lot of you have questions, here's a FAQ regarding ordering, pricing, shipping, design, and anything else that comes up.

How can I order one? 

The only requirement to order these is a photograph of your Takhion(s) and its/their serial number.  To order one of these, please contact me at aeyoqen <at> gmail <dot> com and include your shipping information - what I will do is calculate the shipping and then get back to you with a bill.  Once I receive payment I will put in the order and have them shipped to you directly.  

Edit: International orders seem to require a phone number for shipping verification.

Right, but how much are they?

Each cap is going to be $19, plus overall shipping. 

How much?!  Are you making money off of these?

No.  Originally I wanted to get a batch made to have them to give to people that needed them free of charge, but the fact is these prints are expensive.  I am charging the cost of the print plus shipping.  Truth be told, I've spent hours upon hours and a few hundred dollars on previous prototypes...this is a labor of love and not for monetary gain.  

What form of payment do you take?

Paypal is preferred.  Western Union can also be used if Paypal won't work.  

Why do I have to have a Takhion?   What if I want one just because?

I'd like to keep these with Takhion owners for a few reasons: I'd like to avoid counterfeiting (of the bikes, not the caps), and I'd like to see where in the world these caps are going and the bikes that will be associated with them.  

If you really want one and don't have a frame, send me an e-mail and we'll talk.  I'm usually pretty reasonable :]

Does my Takhion need to be missing a cap to order?

Nope.  If you just want an extra that's completely fine! 

Do these work on Textima or other frames?  

According to the Textima expert, they do not.  I would absolutely love to have a Textima version made though, so if you have a Textima cap and would be willing to help with such a project, please e-mail me!  I don't know about other frames though, sorry.  

Is there a limit to how many I can order?  

Due to turnaround time, right now the limit is two per frame - if you have two frames, you can get four, etc.  In the future that will probably change.  If for some reason you feel like you need more than two, send me an e-mail!

Are these a 100% accurate recreation?

As much as I'd like to say they're perfect, I'll go with they are about 95% accurate.  There were four prototypes made to test measurements and materials, and while the measurements are pretty spot on at least by using my original cap as a reference (and also using original schematics), I could not get the exact same material due to monetary constraints.  

What if I get one and find a mistake?

Then please let me know and I'll fix it!  I've had a few people look at these, and you can check out the photos before for comparison.  

How are they made?

They are 3D printed.  The original model was created in Blender, an open source software.  Some work was also done in Meshlab, another open source software.  

What are they made of?

The printing material is a smooth plastic with a bit of give that is capable of being printed at high resolution.  The original caps are PVC, so the material is *close,* but not exact.  

From Shapeways' site:

"Detail plastic is an acrylic-based photopolymer that comes in white, black and transparent. We recommend using this material for smaller, detailed products that don't face high stress or heat. The level of detail for these products is high, but individual layers are more visible than in Strong & Flexible plastics."


Will it scratch my frame or paint?


I've had no problems so far, and I've installed and removed them on a few frames. 


Does the material have any inherit problems? 

It cannot withstand temperatures over 118.4 degrees F/48 degrees C.  So don't put it in the dishwasher.  It also has a bit of a "wood grain" look if you look closely - this can be seen in the photo above.  
  
Why 3D printing over injection molding?

Though injection molding would be more historically accurate, I wanted to keep overall costs down, and every quote that I was given required a minimum order that was too high.  PVC injection molding is also dangerous due to chlorine gas, and that drove up the price as well.  3D printing allows me to keep the costs down and print in small orders on demand.  

Any chance there might be an injected molded version in the future?

If you're willing to pay for it, sure.  Unfortunately it's probably something that I won't be able to fund myself.  Really serious about this and want an injection molded version?  Send me an e-mail and we'll discuss it.  

Who is printing them?

Shapeways is printing these.  

Why not just have a Shapeways storefront?  

For verification purposes, as mentioned above, and also so that there wouldn't be markup on the caps for the storefront.  I would also have to make the model available for download, which I don't want to do.  

Didn't you say Shapeways didn't work for these the first time?

There were some problems with the first batch from Shapeways over a year ago, but they've improved quite a bit.  I've also changed the model and tested a few different materials, and this one is fine.  So we're all good!  

What if Shapeways doesn't ship to my country?

Shapeways might not ship everywhere, but I will.  I'll order the caps myself and ship them to you personally if that turns out to be the case.  

Why not just do that with every order instead? 

The turnaround time on 3D printing can be a while, and since people are ordering from all over the world I wanted everyone to get them as soon as possible.  Also, it's very difficult for me to get to the post office while it's open due to my work schedule, and it would take even longer to get your caps if I had to send all of them.

What shipping service is used?  

UPS standard shipping is used, and a tracking number is provided.  Expedited shipping is also available.  

What if I get a damaged/bad/broken/missing order?  

Take photos immediately and contact me.  I'll get in touch with Shapeways and have them replace your order.  

What if I receive them and decide I don't want them?

If you're on the fence about whether or not you want one, you can order a material sample from Shapeways for free to see what they're like.  If you do end up getting one and aren't thrilled, send me an e-mail and you can return it to me for a refund.  

Can I buy one for my friend?

Yes, but you have to get your friend's Takhion information!  

Will you send me the model?

Sorry, I won't be giving out the model.  

But I want to make my own and don't know how to model!  Please send me the model!

I too cannot model, so you get to experience the adventure much like I did and learn a lot along the way!  

Is only black available?

Nope...if you really want, you can get white.  Though from personal experience I have to recommend black.  

Are the handlebar plugs coming soon?

Yes.  

Can you show me some photos of the new one with the old one?

You bet I can.


Anymore questions or concerns, please e-mail me or comment here!  And please e-mail me if you're interested in ordering.  If you don't hear back from me within a day or two, comment here and e-mail again to make sure it didn't get caught in my spam filter!!

Aeyoqen <at> gmail <dot> com  

Happy er...capping?  

20140520

Takhion Headset Caps: IT'S GETTING REAL

I know it's been a while.  There was a period of about six months where I had to throw my hands up in the air in frustration and give up because the logistics of this project had become too crazy.  But I hadn't forgotten, and I had kept trying behind the scenes.

To make a long story short, I was stopped in my tracks due to three things: PVC injection molding is kind of really dangerous and lots of companies won't do it anymore, the file format required was being a pain in the butt, and the cost had skyrocketed to the point where I couldn't continue working on this and also afford groceries.

But then a few things happened.  A few good things.  Here's the old cap:


Sad.
 And here's the new prototype:


BAM
There are a few small edits that I need to make - the cap is just a millimeter shy of being wide enough, and the logo itself needs to be rescaled and made more circular.  

Here's the good news though - while this isn't PVC and therefore not 100% accurate, this is pretty close, and most importantly it's really affordable to make.  Meaning I can make them available to people that need them! 

Fingers crossed that the next iteration is the last and I'll be able to offer them for sale by the end of June!

And, this means that next will be Takhion Bar Plugs.  

20140202

Rainy Day Handlebar Modeling

We're finally getting some rain here in California, which is awesome in every way except that it prevents me from getting any frame work done.  However, a request from a reader reminded me that I needed to finish up some work on another project, so here's where I'm at so far today:

Screenshots taken in Meshlab.
Takhion handlebars, modeled to scale.  There is work yet to be done on the angles, but the measurements so far are working...though it's always up in the air until a physical prototype is made.

With the clamp area extruded, to boot.
 These weren't modeled after any specific pair of bars that I have, but rather the "average," meaning I took a few design liberties when it came to width and clamp size.  All of these factors are easily changeable in the model, so it's easy to give these bars a clamp area diameter of 26.0mm and a width of 44cm, or 26.4mm and 40cm, etc.

It's hard to find a view to make these look good.  I guess I need to model a Takhion as well. 
It would be great to get these made with a CNC tube bender, but prior to that I'd like to get a printed prototype to check against the actual bars.  Unlike the Takhion caps, these are not exactly something I can 3D print due to size, so prototyping might be a while off until I get the chance to do some research on local places with tube benders.  

And I know there are a few of you wondering exactly what is up with the Takhion caps - they're not dead, just taking a long, long time with further prototyping and figuring out injection molding and whatnot.  

...I wonder if it's possible to 3D print lugs for investment casting...
Template developed by Confluent Forms LLC; more resources at BlogXpertise