20130430

The Various Commuters of the Silicon Valley

It's always around the same time, every year, when you start to see them.  Bright eyed, bushy tailed, sometimes a little clueless, often looking at lost as a kid on their first day of school.  To be fair, sometimes it does feel like the first day of school - many have no idea where to go, what to do, they've forgotten to get some of their supplies (or they got the wrong supplies), and they don't really know the rules yet.  The veterans all act in their own ways, some eager to help, some indifferent, some outright annoyed. 

Ahh yes, winter melts away, the flowers start blooming, allergies run rampant...

And it's fair weather commuter cyclist season. 

Now, I have nothing against fair weather riders (mostly) so I hope my comparison doesn't come off as rude or condescending.  Seeing more people coming out to ride is something I love, and even if it's your thing to only ride when it's nice, that's okay.  I'm just glad you're out here.  That, and I like seeing all the bikes.


Like my District parked in front of another District - I couldn't find the owner, but excellent bike choice fellow District rider!
Bike To Work Day is upon us, and it's pretty much summer here in California.  Bike shops everywhere are having sales, bike swap meets are going on, and people are getting out and starting to ride again, or testing the waters for the first time.  Most of these people will be gone when it starts to get dark early again, or the first major rain happens, but every year I see one or two that stick with it and become full on commuters.  I tend to find though, that during this time, people can be categorized in a few different ways. Here are some of the more common ones that I've found on my adventures, on both the train and trails...

20130428

The (Almost) Newest Addition to the Family

With the insanity brought on by my adventure to Colorado and all of the preparation that came with it, I haven't had a chance to take some decent photos of what is now the second newest member of my bike family.  This one came to me in the middle of March, and it's a pretty special find: it's the first Takhion road TT frame that I've owned, it came with most of the original parts, and best of all - it's exactly my size.

On display in my brand new birthday-gifted Park stand!

20130426

Moots Demo at Palo Alto Bicycles

Unfortunately I'm all but useless today stuck in bed with some sort of weird bug and a high fever, so there's not too much I can do other than watch cartoons and sniffle while dosing in and out of fever dreams.

Speaking of dreaming...
However, while I have a moment of consciousness, I wanted to write about a pretty cool event hosted last night at Palo Alto Bicycles: a demo and presentation from Moots of titanium bicycle fame.  One of my cycling crazed coworkers was kind enough to invite me along to what turned out to be a pretty exclusive event (I almost didn't get in, but thankfully for me there was a last minute cancellation) and we oogled over the titanium lovlies on display.

Looks like we're in the right place!
For those of you not familiar with Moots, they make custom titanium bikes for just about any cycling appetite - road, cross, mountain, touring, even fat bikes. They'll actually make just about whatever you can imagine, and they're constantly trying out new designs and techniques, such as this trail bike they demoed at NAHBS and had on display last night.


Chainsaw AND a six pack rack?  I'm sold.
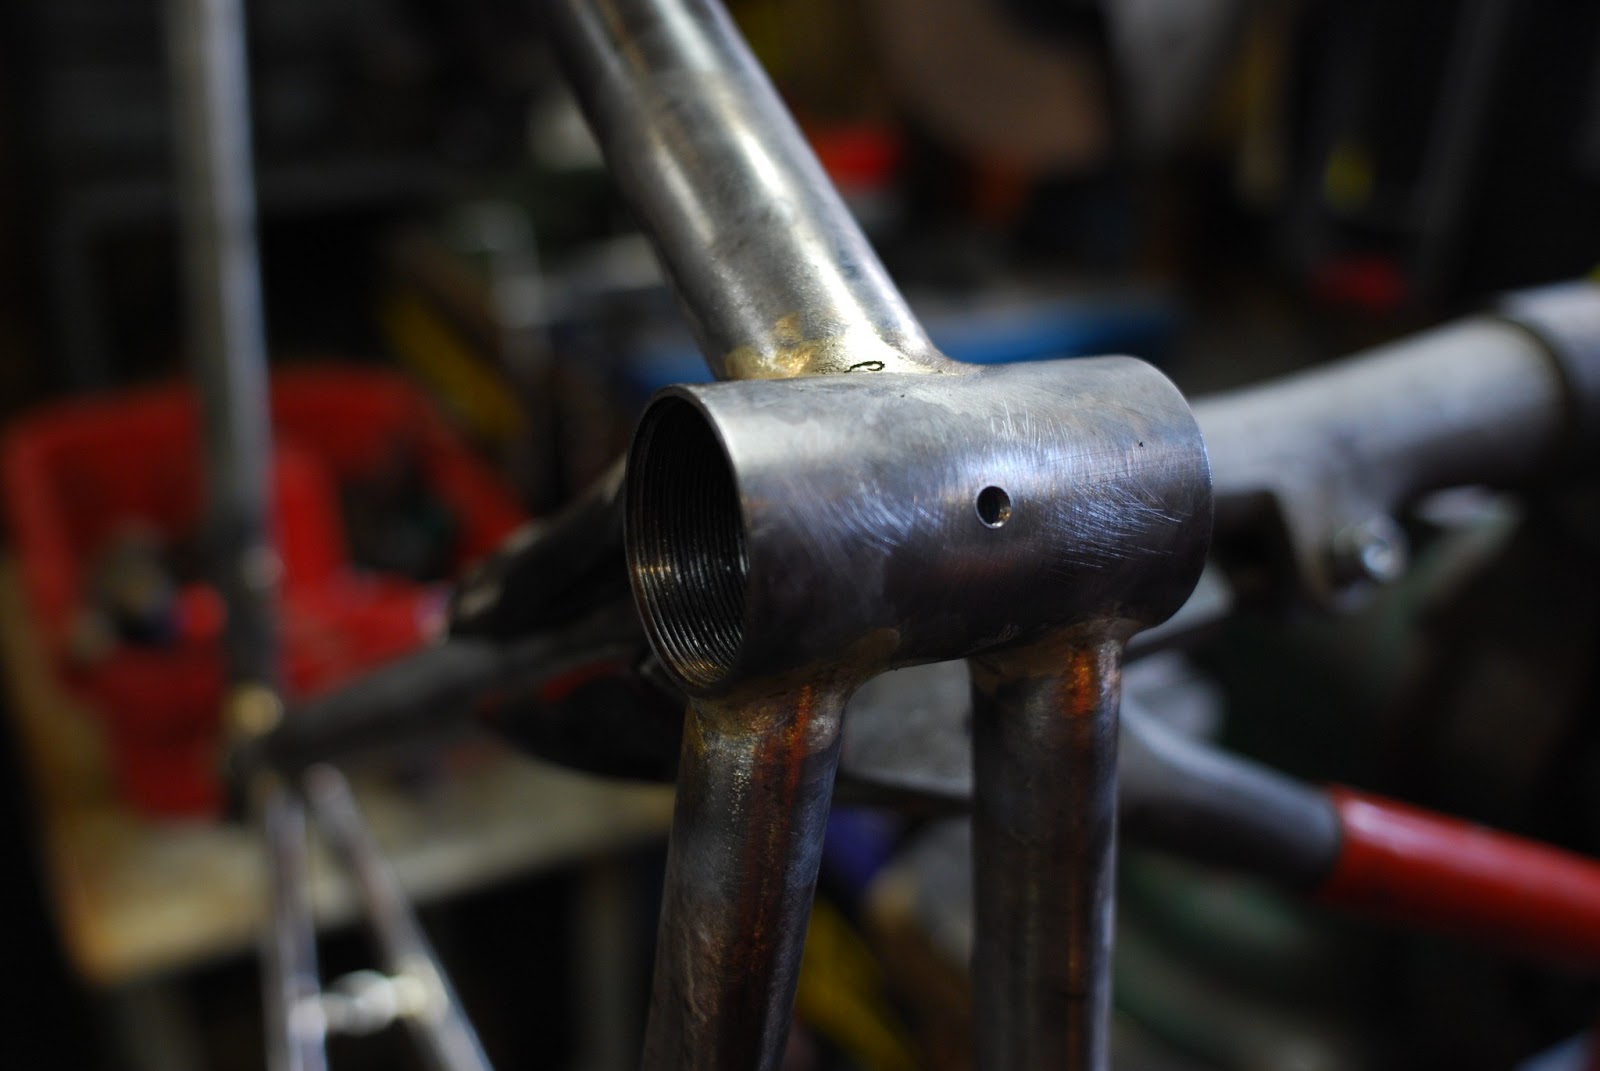
The presentation itself featured photos of the Moots facility and frame building process, along with a Q and A session.  Moots itself is a very small company that takes great pride in their people and their work.  Titanium is not an easy material to work with, so their welders have to have quite a bit of experience before they start work on actual bikes.  The process of welding Ti involved filling the tubes with argon, since oxygen can't be present in the welding environment - but let me back up a bit.  


One of the display bikes.  Stronger than steel and almost as light at carbon, these bikes are stunning in person.
Each Moots frame is made exactly to the specification of the rider, and therefore they are very picky about who their dealers are, as shops such as Palo Alto Bicycles have to have someone on hand who is proficient at taking fit measurements and figuring out what sort of frame a rider needs.  As such, each Moots is unique and all of their bikes and components are just about guaranteed for life.  

Moots itself began using titanium when they were looking for a solution to steel weakening when used in a full suspension frame.  They tried titanium...and haven't looked back sense.  It's nearly impossible to break, light, strong, and when finished with Moots' signature bead blasting, looks classy and stands up to the elements.  They also make seat posts, stems, and a few other components, all titanium.  Aside from making cool frames, they do a lot for their employees and community - that trail bike on display is getting donated for use in trail maintenance, and their employees get a dollar for each day they commute to work by bike.  Pretty cool!


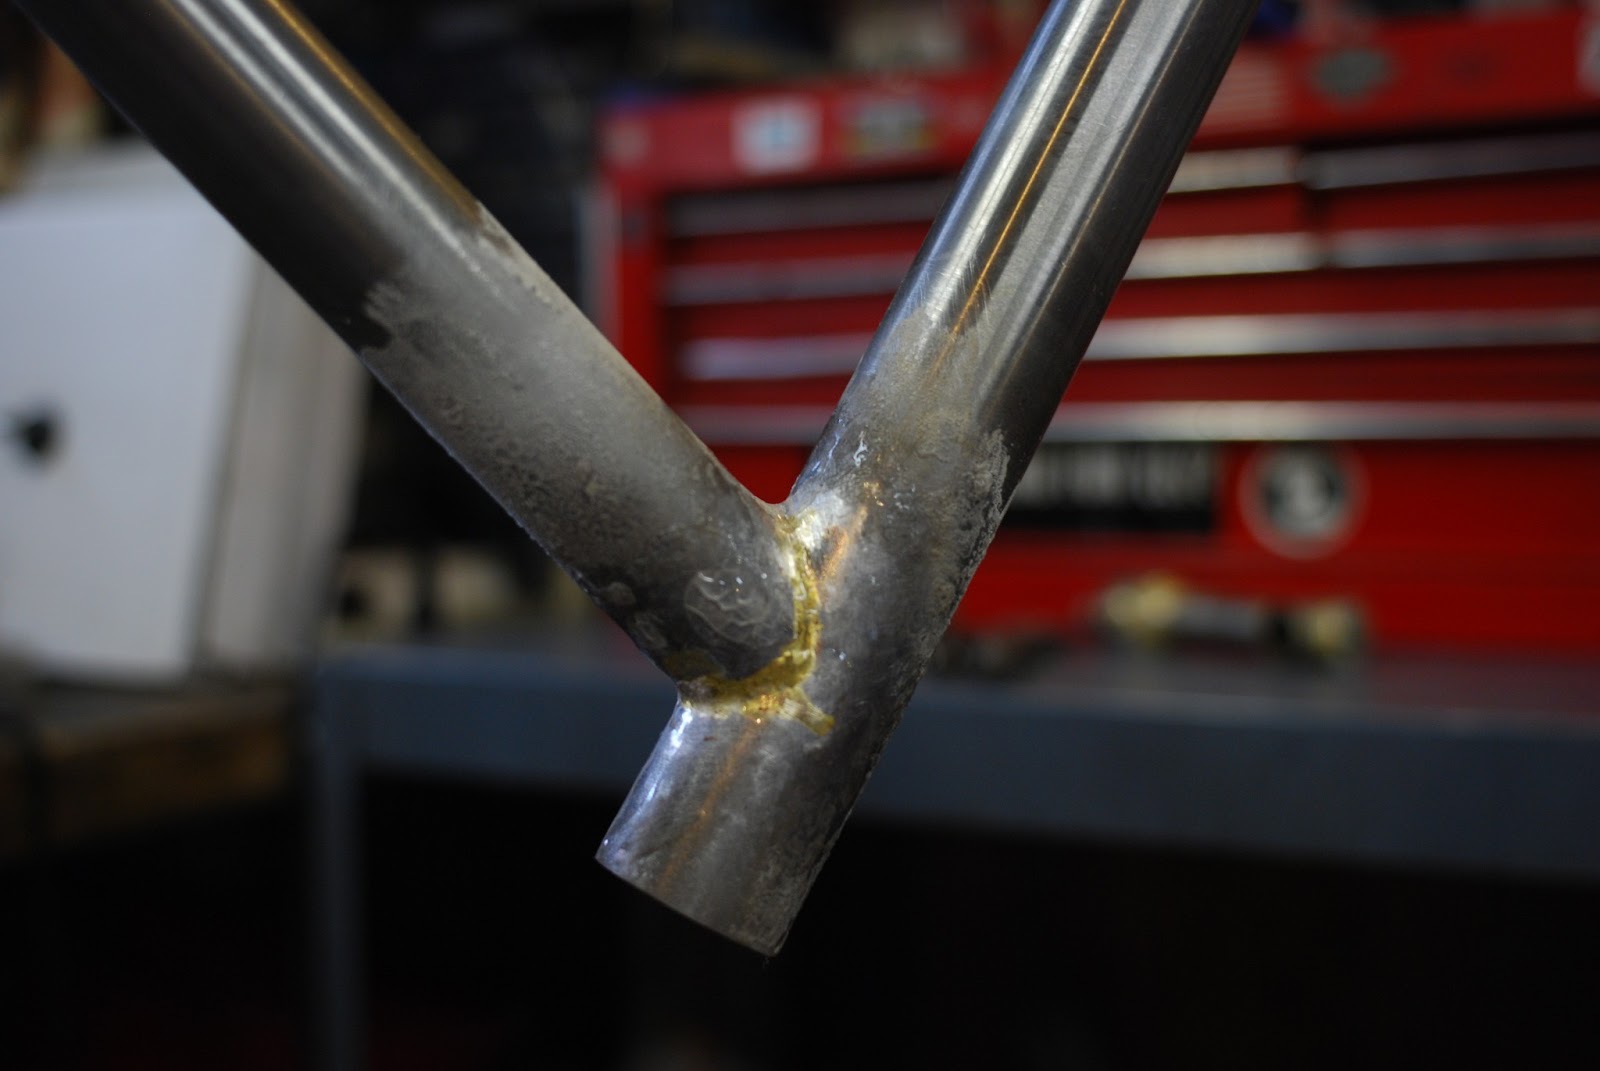
Apologies for the photo quality!  I only had my phone with me.  This is the fork on the Moots CX bike.
The main event of the night was a raffle - there were quite a few Palo Alto Bicycles and Moots goodies, including shirts, kits, bottle openers, and olive oil (which Moots also makes...who knew?) But the prize that everyone was there for was the chance to win a fully custom Moots frame!  And while neither I nor my coworker won a fully custom Moots frame, I have to give a shout out to the lucky guy who did, and had to chuckle when he asked the audience "So...who wants to buy a Serotta?"  


Such nice welds...
Palo Alto Bicycles does a lot of cool events like this, and the shop itself is run by pretty cool people who just want to share their passion for bikes.  There's a ride next Thursday with a Giro demonstration afterwards, and I highly recommend checking it out!

Apologies if parts of this post are feverish and incoherent.  I honestly can't remember when I started writing it.  I'll come back later and edit any weird parts, if I remember.  

20130423

The Yamaguchi Frame Building School: A Postmortem and Review

Now that I've returned to California and have had a bit of time to digest all of the awesome things that I did and learned over the past few weeks, I thought I'd take the time to do a bit of a postmortem regarding my experience at the school.  You can also consider this a review of sorts, if you'd like.  

If you're looking to read the day by day account of the class, Day 1 starts here.

The rather cool people that I took the class with, and our frames.  I'm on the right, in case you haven't gathered that. 

20130419

YFBS: Day 11 - All Good Things Come to an End

Today is my last day here at the Yamaguchi Frame Building School.  To read from the first day, go here.

With a bit of a heavy heart I came into the shop for the last time, but there was no time to be sad just yet.  Lots of little things still needed to be done to all of our frames, and this was the last day, so we all worked like there was no tomorrow.  Well, really, there isn't.

This was open when I came in this morning...and yep, I did get to use them!
First on the docket was finishing my braze-ons, of which only watter bottle bosses and the brake bridge remained.  First using bottle cages as placement templates, Mr. Yamaguchi showed me the best way to find a good spot for each cage.  Then with a specialized watter bottle boss jig and a drill bit suited for the job, drilling the holes began.  I managed to break a bit (oops) so Mr. Yamaguchi made a new one with a longer bit and a saw, which was pretty impressive.  The rest of the holes went smoothly, and brazing was as easy as heating up the boss and touching the silver brazing rod to it - the heat sucked the silver all around the boss and it was done.  Four bosses later, it was time for my brake bridge.

For all of your water bottle (or burrito, those fit well too) needs.
The bridge itself was already made, but needed to be cut to fit at the right place in my stays.  This process started with a hacksaw, then a careful miter of each side so that it would fit in my stays and keep the brake center.  Once it was there, it was time for my last brazing.  I brazed the bridge on with bronze, and it was the best brazing I've done yet - no burning, smooth, and shiny.  Just when I'm getting the hang of things...

Itty bitty brake bridge.
My frame went to the tank for the last time, then I moved onto the fork.  I needed to drill the brake hole and face the steer tube.  To set up the fork in the drill press, the blades need to be level with each other, and with the ground.  A small pilot hole is drilled through the whole way from the front of the fork, then a larger hole is drilled.  Flipping the fork over and setting the levels up the same way, Mr. Yamaguchi then used a special bit to drill a shallow indentation where the bolt would fit flush with the frame.  The rear hole also had to be 2mm wider, so an 8mm bit was used on just the rear hole.  

After drilling, Mr. Yamaguchi busted out the Campy tools, and after telling me how expensive and rare and delicate they are handed me the headset facing tool to use on the fork.  Only turning the facer clockwise, and adding tap oil every twenty or so revolutions, I slowly worked on my fork.  When it was done, Mr. Yamaguchi carefully removed the tool and inspected my work.  All was good!  The tool and fork needed to be cleaned with compressed air, and my fork was done.

I'm ready for my crown race.
Still waiting for my frame, I moved on to the stem.  I needed to cut notches in each side so that the clamps would work, so I busted out the hacksaw and cut away the center of the stem clamps.  I filed and sanded down the edges so that they wouldn't be razor sharp, and then did a bit more finishing work on my stem.

A stem and collection of junk tubes from the various cuts I've made all week.
My frame was now out of the tank and ready for the last little bits and pieces, but first was a final blast with the wire brush to clean all of the braze-ons and give the frame a nice, all-over shine.  I had to also cut my seat tube so that the clamp would work, so I used a special three blade hacksaw and then drilled a hole at the end of the notch.  Then it was time to face the headtube and bottom bracket, and ream the seat tube.  

It was both nerve wracking and exhilarating to use such an awesome toolset.  Rare, highly sought after, and incredibly expensive, they work amazingly well and really get the job done.  
I got to use the Campy heaset and bottom bracket tools, and it was very much the same process as the fork.  Not too fast, only clockwise (except the bottom bracket, of course), use tap oil, go slowly.  Facing actually went pretty quickly, and everything was cleaned with compressed air and checked for accuracy.  Reaming the seat tube was similar, but a little less daunting since we weren't using a Campy tool.  Facing was done!  

Shiny and ready to go!  Everything is coming together at this point, and it really feels like a real frame.
The last little thing was drilling a hole for the bottom bracket cable guide, and then tapping the threads so that the bolt would fit.  After everything I've done, this was easy enough.  Alignment was next.  To align the frame, first the frame goes on the alignment table and the seat tube is checked.  My seat tube was about 1mm too high, so Mr. Yamaguchi put his weight on it to push it down, or align it.  This was scary to watch, as I was nervous for my frame, but Mr. Yamaguchi assured me that increments of a few millimeters won't hurt the frame, and most production shops use hydraulic machines anyway (and things can be off to about 2mm!!).  The seat tube was fine, then the head tube was checked using a needle level to see if both sides were the same height.  I was .5mm lower on one end, so a rod was inserted in the head tube and twisted using the level end as the pivot.  Mr. Yamaguchi remarked that my frame felt really strong - a reassuring thing to hear!!  Next, the height of the seat tube in relation to the head tube was checked and fixed, then onto the dropouts.

This is for the cable guide attachment, which I'll put on after painting.  
First was making sure the dropouts were aligned with each other, which they were.  Next though, I had to check that they were the correct spacing, and also not offset in one direction or the other.  Using the seat tube as a base, the frame centering tool was moved in between the dropouts and then expanded until it touched.  The upper dropout was higher and the measurement was a little under 130mm, so both dropouts were adjusted until all was good.  The same process was used to check the fork alignment.  All was aligned, and according to Mr. Yamaguchi should be good for a year or two (though most likely more) and my frame was done!

The last little bit of time we had left was used to finish as much of the cleanup and finishing as possible.  Most students go home with a bit more sanding and filing to do, and we were no exception.  I was filing away and slowly getting my frame closer to perfection (well, for a first frame anyway), when Mr. Yamaguchi asked for a group shot with all of our frames.  

Upside-down frame.  Time was short today so I couldn't get many photos, but when I return I'll post everything that Mr. Yamaguchi gave to me on disk, which actually include action photos.
I used the letter stamps to press my name into the fork steer tube and the BB shell - a very faint "Psy" can be read on both.  We packed up our frames in bike boxes and said our goodbyes.  Mr. Yamaguchi gave us each a CD with photos from our class, and a diploma.  And with that, all of us had completed our frame building course here at the Yamaguchi Frame Building School.

Though my time here is over, my journey is far from complete.  The frame still has to be finished and built up, which I will be writing about here.  I will also post photos and an epilogue of sorts after I return to California.

In short, this was one of the best experiences of my life, and I will never forget my time here.  If the idea of making your own frame excites you in the least, you need to come here and experience this for yourself.  You won't regret it.

20130418

YFBS: Day 10 - Just A Hair More

I've almost completed the framebuilding class here at the Yamaguchi Frame Building School.  To read the first entry, click here.  

There isn't much class time left, so we're all working quite hard to finish our frames as fast as we can.  Having prepped the dropouts yesterday, I got a demonstration on how to properly braze them on when I got to class - the dropout itself is heavier material, so Mr. Yamaguchi showed me how he mostly heats that area and then fills in the fishtail cuts with bronze brazing.  I finished up the dropouts and my frame went in the tank.


Hangin'.
While the frame soaked, I moved onto brazing the fork blades into the fork.  Strategically drilling the holes in one of the decorative parts of the fork end lugs, I prepped the blades and cleaned everything while Mr. Yamaguchi showed me how to set up the jig for the final brazing.  My fork has a 45mm offset, a measurement that could be found by the ruler that had been built into the jig.  Once the offset was configured, the blades were in the crown tightly, and everything was aligned, I started to silver braze the fork.


After silver brazing and soaking in the tub.  
The silver brazing went fast, and once it was inspected and approved it joined my frame in the soaking tank to remove the flux.  In the meantime, I did some finishing work on my stem.  Mostly it was filing down the extra fillet, but I also filed in some half moon shapes near the handlebar clamp bolt to make handlebar installation easier and more manageable.  More filing was done, and my stem was getting more and more finished, but my frame had come out of the tank and was ready to go.


With half moons and some finishing.  
Out of the tank and polished up!
Using the wire brush, I cleaned up all of the reachable areas on the frame and the fork, which had also come out of the tank.  Brushing the frame really made it shine, but some areas couldn't be reached with such a bulky tool.  That work would have to be done by hand, so I began to finish the bottom bracket.  Thankfully my brazing was pretty clean, so finishing wasn't too much of a problem for most areas.  Alternating between various sized round files, I worked at the areas around the bottom bracket and stays as much as I could.  It soon became obvious that there were some areas that were going to be too tricky to access with the files, so Mr. Yamaguchi gave me a dremmel with a special tip to get the job done.  "Power tools are nice, but it's best to do as much as you can by hand," he warned me, "as it's easy to damage the frame with these tools."  The tricky areas of the bottom bracket didn't stand a chance, and I spent a bit of time cleaning up the dropouts and seat stays while I could.


Getting there.  Notice the clamp on the chainstay - specifically crimped for a compact crank.  Everything about this bike is very specific, and it's important to know exactly which parts will be used before building!!
At this point the frame looked nice, but not very functional, unless I was going for a track bike with the wrongest kind of dropouts.  I needed to braze on my braze-ons.


Awaiting braze-ons!
Pulling parts from a collection of toolboxes and compartments, Mr. Yamaguchi collected each of the braze-ons we would need.  My frame required brake cable bosses, cable guides, a rear derailleur cable guide, watter bottle bosses, and a brake bridge, which would be last.  The first braze on I did was the brake cable guides, which are not quite directly under the frame, but just barely touching a straightedge when the straightedge is aligned against the top and downtubes.  They're also each 7mm from the miter lines on the head and seat tubes, so I measured and marked where each would go.  Using special "doggies" that are made of nails and bronze to hold the boss in place, I fluxed everything up and set to work tacking.  


The brake and derailleur cable bosses are visible.  Starting to look like a truly functional machine.
After the brake cables guides, a tiny derailleur cable guide was brazed on, followed by the derailleur cable guides.  The brake bridge and water bottle bosses require a different procedure, which I'll have to find out tomorrow.  


Tiny little cable guide helmet dude!
All things considered, I'm actually in fairly good shape as far as everything goes - my stem is just about completely finished, I only need to do a little more to my frame, and my fork is also good to go.  Tomorrow will be the last little things and final touches.  


:D!

20130417

YFBS: Day 9 - This Snow Just Got Real

I'm still here in Rifle documenting my time at the Yamaguchi Frame Building School.  The first entry is here.

After a short hike through about a foot of powdery snow, I started right where I left off with tacking the chain stays and dropouts into place.  Tacking and brazing are starting to get a bit more difficult with the inclusion of more tubes, as the frame has to be worked from some funky angles.  I worked quickly to tack so that I could move onto the seat stays.

The chain stays tacked to the bottom bracket.
And the dropouts!  Notice the plate holding the dropouts in place so that they're aligned.  Another homebrewed tool!
Last night I took a bit of time to decide how I wanted to join my seat stays to the seat tube.  One of my classmates did a triple triangle style, which is one of Mr. Yamaguchi's signature styles. I really loved the look of that, and wanted to either do the same or something similar, so I ended up going with this sort of design, which gives me most of the strength of the triple triangle while still looking pretty slick.  Now that I'd chosen, it was time to cut, miter, and slot the seat stays.  Cutting and slotting were the easy part, exactly the same as the chainstays.  


The dropout end of the seat stays, slotted, drilled, and sanded.
Mr. Yamaguchi suggested that I make my stays parallel to my downtube, which adds a nice symmetrical touch that really makes the frame look classy.  He showed me how to measure where the tubes would go so that they remain parallel, then set up a jig to hold them in place while I filed them down simultaneously.  Going back and forth from filing to checking against the frame, I filed down the stays until they locked to the frame and were at the right place on the seat tube.  Everything was sanded and cleaned with acetone, and the last round of tacking began.

Here's the special jig to hold the stays in place while they're filed.  
While I waited for my tacking to cool so that I could remove the frame from the alignment table jig, I continued to work on the fork.  Measuring from the brake hole to the center of the fork ends, Mr. Yamaguchi pointed out that my fork was 410mm long, whereas it should only be 355mm.  He marked off a good place to cut each fork blade, and I started to work on that.  By the time I was done, the frame had cooled and I moved it to a stand to continue brazing. 


I kept looking out at the snow.  Spring in Colorado is weird.
Speaking of forks, no class is complete without a history lesson, and today was bit regarding the origin of straight blade forks.  The first straight blade fork was made by - you guessed it: 3rensho.  However, when the bike was brought to the NJS for approval, it was considered too unusual and wasn't approved by the NJS.  Word spreads though, and a few years later straight bladed forks appeared on a few major Italian bikes, though to this day they're still banned by the NJS.


The first straight blade fork, circa 1979.  
Back to work, first was cleaning any burned areas from the tacking, which there were few of (I'm getting better!), then I had to internally braze the chain stays.  Once that was done and approved by Mr. Yamaguchi, I cleaned up again and moved onto externally brazing all of the bottom bracket, taking care to make an even fillet all the way around.  It was tricky getting into the areas between the tubes, and it took a little while to get the brazing perfect.  


All internally brazed up!
Brazing the seat stays to the seat tube was the next step, which Mr. Yamaguchi showed me how to do.  The seat tube is very thin walled compared to the stays, so much care has to be taken to not overheat it.  The brazing for these was sort of a combination of internal and external at the same time, and they were done pretty quickly.


A quick, but delicate process. 
One of my classmates who is making a CX bike was asked about how he should do his seat stays.  Since cross bikes need more tire clearance, his tubes will be brazed higher up and on the outside of the tube.  This led to a conversation about various seat stay designs - Italian fastback, different lugged types, etc.  We were warned that some styles, while looking nice, are not optimal.  For example: wish bone style seat stays are too stiff on steel frames for road bikes, and some lugged seat stays have so little material brazed to them that they can crack and impale a rider's leg all the way through.  We all cringed at that one.


Simple, aero, and pretty sweet.
I didn't have time to start brazing the dropouts, since class was almost over for the day and it's optimal to not stop brazing once you start, but there was time to check on my fork blades.  After I installed them in the fork crown, Mr. Yamaguchi checked my measurements.  355 exactly - probably the first time I got something exact with one try!


A little more brazing and this fork is forked!
Lastly, I cleaned up the dropouts with sandpaper and applied flux, with just enough time to dry it in preparation for tomorrow.  First thing in the morning will be the dropouts, and then onto finishing the fork - we're in the home stretch!


Oh man I can't wait to ride this.
While I'm pretty psyched about my frame so far, I'm also a bit sad that my time here is almost up.  I'm trying to enjoy every moment while I can.


20130416

YFBS: Day 8 - Getting Sushi in Under an Hour

Over the past week, I've been writing about my time here at the Yamaguchi Frame Building School.  The first entry is here.

Coming in from the frigid morning I found my frame soaking in a nice hot frame bath to remove the remaining flux.  It was pretty exciting to finally see it without flux, and it also allowed me to check all of the brazing areas and see if anything needed to be fixed.  There were a few small areas near the lugs where there wasn't enough silver, so once it was dry I patched that up and moved on to cleaning up the seat tube fillet so that I could start on the stays.

After walking in the 30 degree weather, I was a bit jealous of my frame.
Mr. Yamaguchi made cleaning the fillets look easy and quick, which means for the average beginning frame builder it was just the opposite.  I spent quite a a bit of time using the round file to work down the fillet to an even height, then used small strips of 80G sandpaper to get into the corners and hard to reach areas.  After finishing everything off with 100G sandpaper to remove as many of the file marks as I could, I was ready to braze on the seat clamp with silver.


Cleaned up fillet and a seat clamp!  Now we're getting down the business.
I sanded, cleaned, and fluxed the seat tube and seat clamp, making sure it was level and straight on my frame, then used the gravity method to pull the silver through under the clamp.  While I waited for that to cool, I began work on the fork blades.  Different manufacturers make tubes, dropouts, and fork ends, so sometime tubes have to be adjusted to fit properly.  This was the case with my fork blades and the fork ends, so Mr. Yamaguchi showed me how to measure where the fork ends would fit and how to squeeze the tubes (yikes!) so that they fit in the fork crown.  Once that was said and done, it was time for lunch.


The filed down fork, ready for blades!
Right before shaping the fork blades.  Squeezing the tubes was a very precise and kind of scary process.  Also, my coffee had lots of metal filings in it by this point.  
My fork ends!  Filing inside of the cutouts was a bit difficult.
Since I found out that one could get sushi here in Rifle, I was both intrigued and disturbed by the thought, but my curiosity got the best of me when we went to the Thai Palace (Best Steaks in Rifle!) for lunch today.  I decided to try a roll, and waited.  It was then that we discovered that a single sushi roll takes just under sixty minutes to make.  And sushi in Rifle is just about as good as I figured it would be, but hey, when in Rome!  

We got back to class and all went back to our respective tasks.  My frame was back in the hot tub to clean off the new flux that I applied when I brazed the clamp and fixed the lug, so in the meantime more work was done on the fork.  Using a special jig to make sure the blades and fork ends were aligned, Mr. Yamaguchi demonstrated how to braze on the fork ends, which I did.  By the time I was done, my frame had finished it's soaking and was dry.  He grabbed an automated wire brush, and I was shown how to buff the lugged areas, making them nice and shiny.  I finished buffing (which was a lot of fun, I might add) and was then ready to move onto the stays.


Hanging out after some wire brushing!
Close up of the seat stays, all shined up.
To ensure alignment and proper measurement of the chain stays, Mr. Yamaguchi set up a template of my bike in the frame jig and then showed me how to measure the stays.  I cut each stay down to the proper length, then another special jig was set up so that I could miter the stays at the same time. Once the miter was done and the stays fit snugly against the bottom bracket, the tubes had to be slotted for the dropouts.  You want the tubes to be about halfway up the dropouts - not too far, or the wheel will be hard to remove, but not so little that the frame loses its integrity.  


The special jig for mitering both tubes at the same time.  Made, of course, by Mr. Yamaguchi himself.
Slotting was a difficult and precise process, but after minor adjustments here and there, I got my stays to the perfect length.  I had just checked then in the jig and drilled the holes for brazing when class came to an end for the day.

I'll be doing the seat stays tomorrow, so I'll be spending the rest of tonight looking at different designs and seeing which ones I like best, and also what will be best for the road bike, both structurally and aesthetically.  I've got some homework to do!


20130415

YFBS: Day 7 - You Mad Bro?

I'm continuing to document my adventures here at the Yamaguchi Frame Building School.  The first entry can be found here.  

The title of today's entry comes from the phrase of today, brought to you by Matt's reaction to me asking why everyone was hanging out under awnings wearing flannel and smoking cigarettes.  

After a day of rest, we dove right back in to where we left off, starting with silver brazing the clamps onto the stems.  It was pretty exciting coming into class and seeing our stems all cleaned off and shiny, but the clamps still had to be brazed and the finishing done.  I placed each clamp at a time to make sure they were center and level, and then brazed them on.  More pressing matters were at hand, so the stems were set aside for the time being.


My stem sitting with the rest of tubes.  One happy family.
Clamps brazed on - now it really looks like a stem!
Our main triangles needed to be finished, and since this is crunch week the sooner they get done, the better.  Mr. Yamaguchi set up the alignment table with my frame angles, and I proceeded to make the last two miter cuts I needed for the frame.  The first cut was the downtube to the headtube, which has to fit nicely and also line up centerline to centerline.  At this point, the fit must be checked after just a couple seconds of filing each time, so that the angles are still accurate and not too much material is taken off.  Once that miter was done, I mitered off a small arc where the downtube meets the bottom bracket so that the tubes will lock together.  It was almost time to tack!


My tubes all set up, and fluxed.
I sanded, drilled, and prepped all of the tubes while Mr. Yamaguchi showed me how to set everything in the jig.  Liberally applying flux before setting the tubes (bronze for the seat and bottom bracket and silver for the headtube, I got everything locked in place, something that the lugs helped with quite a bit.  Once I dried the flux, tacking began.  


Close up of the head tube in the tacking jig.
I managed to do most of the tacking without burning the tubes, so I only had to do minimal clean up before moving on to internal brazing.  Even minimal clean up is a lot of work though - all discolored areas have to be filed, sanded, re cleaned with acetone, and then covered in more flux before brazing continues.


Close up of the bottom bracket.  The seat and down tubes are cut so that they lock together.
Internal brazing the seat and downtubes was much easier this time, and my frame whistled happily as I moved the torch to pull the bronze inside.  The miter lines were still pretty visible when I was done, meaning I'm sort of getting the hang of internal brazing.  After internal was external, but only for the seat tube.  Since I had to wait for the main triangle to cool down before I could clean it, I started to file down the extra material from the steer tube near the fork crown.


Ready to do some real brazing, and it's looking like a bike!!

Filing takes a long time, especially when you have to be precise.  My fork crown  still had a ways to go in this photo.
My fork was filed and the frame cool to the touch, so I cleaned everything up (sensing a pattern here) and started to externally braze the seat tube.  It was the same process as the stem, except maneuvering the frame around to keep everything at the correct angle was a bit of an acrobatic process, especially since you can't touch the tubes at all due to the heat.  Or, you can, but then you end up with dropouts burned into your face for the next two years, as Mr. Yamaguchi told us.  


The seat tube prior to external brazing.  It might seem like not a lot of bronze was used, but it was all just pulled into the inner seam, reinforcing the frame from the inside.  The More You Know.
After tacking.  Look!  Lugs!
We're not external brazing the bottom bracket until the chainstays are tacked.  
The last task for the day was silver brazing the lugs.  Since the little parts of the lugs heat up really, really quickly, this was much harder for me than the fork crown was, and I ended up burning more areas than I would have liked to while pulling the silver through the lugs.  Near the end I was doing much better, but there's still going to be a lot of clean up.


After silver brazing.  The black is bad, but the green is good.  Temperature is really, really finicky when silver brazing, and great care has to be taken to not burn the tubes.  It's something that comes with experience, Mr. Yamaguchi told us. 
And with that, my main triangle was done!  Tomorrow I'll begin the seat and chainstays.  I almost have a frame.  


Template developed by Confluent Forms LLC; more resources at BlogXpertise