20130627

Takhion Headset Caps: The Second Prototypes

If you missed the beginning of this, here you go.

After I was nearly eaten by an angry man due to the bike car being absolute chaos because of some gnarly Caltrain delays, this happened.  

Take two was much more successful.
After my last attempt, I went on a search to find a more suitable printer that could give me something with a better material that was closer to the original.  The awesome people of Incept 3D were able to help me out by giving me something called Shore A 95, which is basically a very strong rubber.  At the time, I didn't know the original material of these caps, so this was my next best choice, but I'll get to that later.  The upsides was that this provided me with a strong, flexible, and watertight cap.  Plus, the guy I spoke with at Incept was amazingly nice and very understanding of my complete lack of 3D printing knowledge, and worked with me through the whole process to help me out.


Perfect fit?  Perfect fit.
The pros: this prints are very, very well made.  They're high quality, high definition, and they fit perfectly in the handlebars and in the frame.  They were also made very quickly - if you need something printed, seriously go to Incept 3D.  To be honest, I would love to make a batch of these because of the quality and customer service level that I received working with Incept, but unfortunately that brings me to the next part.  


The logo is the right way this time!
Here is where I have a dilemma.  These prints are far, far too expensive for me to make a batch of, let alone provide to people that need it.  The technology required to print this material is still very high cost, and even though Incept was nice enough to work with me to get my order down to something manageable, it won't be viable to mass produce this particular print.  Also, as much as I like it, I didn't quite get the detail I wanted in the logo due to the complexity and the properties of this material.  Not anyone's fault, just the laws of physics.  

So, I will be working with another company to create injection molds so that these can be produced for a much more reasonable cost.  Not to mention - I didn't know it at the time, but using injection molding will also allow me to use the correct material: polyvinyl chloride, or PVC.  How do I know?


The real deal.
The real deal.
Mr. Vorontsov of Takhion framebuilding frame was kind enough to send me the original schematics and information for the caps and plugs, all with the help of an excellent guy in Boston who has a killer bike collection and has been nothing but awesome to me.  I'm extremely grateful for their help and wish I could do more to show my appreciation!  Спасибо!!

Here you can really see the difference in materials.
Here you can really see the difference in materials.  
With the schematics, I will have to rework a few things on the bar plugs that I did wrong (now that I have actual drawings I realized that I borked them pretty badly), and I will also be cross checking the headset caps before sending them off to make a batch. Though I feel that they are ready as they are now, I want them to be as close to accurate as they can be in both measurement and materials.  Nonetheless, I should be ready to send them off for a mold very soon, though since I have to make two versions of the plugs - brake and brakeless - those may take a bit longer.  I'm working on it, I promise!!


Old and new.
Old and new.
A few people have contacted me saying that they're interested in these, so at current I have a small batch size that I am planning to make.  If you need one of these caps, please comment here or e-mail (aeyoqen <at> gmail <dot> com) to let me know so I can get a decent count!  I will be sure to make extra so that there will be plenty available in the future.

Time for some model updates!

20130626

At Least This Time I Remembered Pants

I haven't ridden a bike with a chain in a considerable amount of time, so my guess is that I was probably hugging molesting moving someone's bike on Caltrain when this happened.

My calves eat small animals.
Strangely enough there was rain here over the past two days, which was nice for me because there was hardly anyone else out and I'm terribly awkward around other people.  The sun came out today though, and everyone that's afraid of melting in the rain or something was back out to ride, along with what seemed like a horde of other new riders.  Maybe summer vacation has something to do with it - suddenly you don't have to drag your kid to school every morning, so hey, biking seems like a nice option.  

It's definitely summer in the bay.  The days are warm, the nights cool down to light jacket weather, and the days of lamenting a lack of AC are upon us.  Perfect riding weather, if you ask me.  Here in the bay summer means riding to all sorts of events and festivals, enjoying the last flowers of spring, long shadows of bikes and their riders, and of course lots of mint lemonade.


And of course awkwardly trying to take photos of shadows without getting your fingers in them. 
Summer for me will also mean finishing up this bike, which ideally will be done sometime in mid August to get ready for lots of fall riding.  I'm down to the very, very last thing that I need - the group.  At this point I've even got the bar tape.

In the meantime, I'll just continue to ride to work while forgetting things like shoes, which means that I went around the whole day like this.


I try to keep it classy.
If UPS isn't lying to me, I'll have some new Takhion headset cap prototypes tomorrow.

20130623

(Wrenching) On A Sunday

It was one of those help-a-friend-remove-a-bottom-bracket-then-replace-a-pitted-headset Sundays.  First up, pulling a Phil Wood bottom bracket from a frame that's bound for donation (or possibly fated to become a commuter for someone in need of a ride).  I'm the one behind the camera in all of these shots, though the reason there are so few of them is because for the most part I was covered in Phil Wood grease doing headset trickery.

The most important tool when working on bikes.
The frame in question was an old Raleigh Technium with a rather pretty color scheme of maroon and gold.

Loosening the lockring by hand once it had been unscrewed enough with the lockring tool.
Probably there is a proper wrench to do this with.  This isn't it.
This turned out to be surprisingly easy, considering some of the things I've had to do to pull old bottom brackets in the past.  

Phil makes bottom brackets look so pretty.
Phil Wood is pretty close to where I am, and they have exceptional customer service.  I believe this one was originally found in a Fuji frame that I picked up for about $20, and Phil made it look pretty again as part of the warranty, I believe.  Not to mention after being in that rusted out Fuji frame that looked like it survived (and fought in) a few wars, the bearings were still smooth.

Next, a new headset for an old Trek that had been being ridden around with a headset that was pitted in a crash (cringe).  

Removing the old headset, which came stock with the bike in the 80s.  
There's a rule when working on bikes that nothing can ever go exactly as planned, so there was a minor setback when the NOS headset that we picked up turned out to be 1 1/8" instead of 1", but after a quick trip back to the bike shop everything was straightened out.  If things ever do go as planned, be prepared for something terrible to happen next time (like fenders).

Old components, and a fork waiting for a new crown race.
Cups are pressed!
It actually looked pretty nice with the NOS Shimano 105 headset that was put on it.  It will look really nice once this frame gets a new paint job, which should be soon.

This old Trek has a new lease on life.
All back together.
Perfect way to spend a gloomy Sunday afternoon.  Even little tasks like this that I've done many times before are always enjoyable, and I feel like each time I learn something new.  Plus, it's a great way to hang out, and when it's over everyone smells like Phil Wood grease and Simple Green.  

20130622

Hats

While enjoying the San Mateo Summer Fest today (with perfect riding weather, nonetheless), I ended up over at Talbot's Cyclery and was looking at their selection of Walz Caps.

I'm a sucker for matching colors.
Seeing as I've always wanted a Walz Cap anyway, and I like riding with cycling caps under my helmet every so often, I couldn't pass this one up.  

I have no shame.
There's quite a bit of debate in the cycling community regarding cycling caps, it seems.  Personally, I say wear what you like, however you like.

Hope everyone's Sunday involves some good riding and good wrenching.  Preferably both!

20130620

On Infrastructure

I have a love/hate relationship with bike lanes.

It was when I found myself behind a Honda Fit with a homemade "STUDENT DRIVER" sign pasted in the back window (Times New Roman, probably size 20 font) on my way home Tuesday I realized I should probably be a bit more careful than usual.  Rush hour traffic in downtown with a new driver is generally not a good combination, and of course this point was driven home when Student Driver decided to right hook me.  

I was in the bike lane with a green light, and the Honda Fit was right next to me.  When I was just next to the car (and probably in an unfortunate blind spot) Student Driver turned on the blinker and started to turn across the bike lane into me.  Fortunately I was being cautious - I stopped, shouted a combination of "hey/whoa man," and lightly knocked on the window to let them know I was there.  Student Driver stopped, and then inched forward straightening out before proceeding to make a right turn across the bike lane, while managing to cut someone off and get honked at.  Despite the fact I had right of way, I wasn't going to challenge or harass a student driver, so I let them go with a wave.  I have a feeling I freaked them out enough as it is with my window knock and slurred shout.

Mostly though, I wanted to know what the law states regarding these situations, so when I got home I did some research.

- It is not technically illegal to turn across another lane, but like merging the lane must be clear before turning.
- The truly legal (and safest) thing to do is have the car signal ahead, merge into the bike lane before the turn, and then turn.  The cyclist, in turn, is supposed to take the lane and pass them on the left.

So technically speaking, we were both in the wrong.  Since I was going straight and Student Driver hadn't previously merged into the bike lane to turn, I did have the right of way.  However, when I saw the turn signal, I should have taken the initiative to pass on the left...a bit difficult though, since I was already on the right.  

Many cyclists I know scream at the idea of a car entering the bike lane, and many motorists seem to not like the idea of entering "the forbidden lane" (okay, well, some motorists), so this is where my love/hate relationship comes to a point.

I love bike infrastructure, but in situations like this I feel like lack of education is a huge issue.  It's been proven that having adequate bike lanes and cycle paths is a leading factor in getting people out to ride, and improvements to this sort of infrastructure also help build better and more accessible communities.  I know there are plenty of cyclists who are all for being straight vehicular cyclists, but that comes with experience...and you have to ride first. 

Regarding the aforementioned lack of education, how often have you seen someone going the wrong way, thinking it's okay just because "they're in the bike lane?" Or the people who do unsafe speeds on MUPs and will give you a piece of their mind if you ask them to be careful?  And then there are vehicles like the one I encountered where the driver doesn't know how to behave around bike lanes, either turn across them or treating them as a regular lane.  Or the motorists who assume that cyclists will always run signs so they stop when the have the right of way and hold up traffic - I know they're trying to be nice, but it doesn't help.  Yes, cars, cyclists, pedestrians, etc., all have these faults, but what I'm trying to say here is that often people use this infrastructure without really knowing how.   I've been riding daily for years and try to keep up with the laws pretty well, but even in situations like mine I wasn't entirely sure who in the right.  

When a new bike lane, box, or path is installed it's generally assumed people will automatically know what to do.  Fortunately, some cities are taking initiative to help out a bit.  Portland, specifically, has a sign installed to prevent right hooks.

Even something like this would help out, I'm sure.

I wonder if we'll get any of these in the near future.  Photo from here.
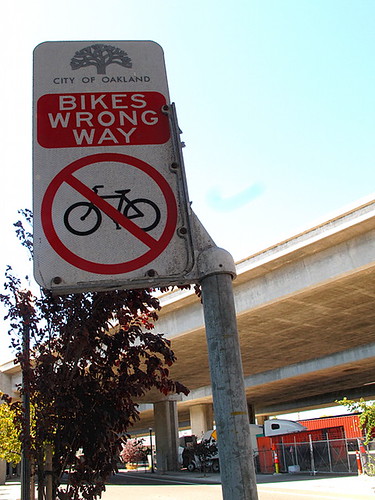
And Oakland is doing something about the Salmon.

I'm tempted to order a couple thousand and install them myself.  Photo from here.
There's also the not so subtle approach.

Photo from here!
I'm not at all saying no to bike lanes or similar infrastructure - I certainly welcome more of it - but I do wish that it came with a bit more education for both cyclist and vehicle.  A few well placed signs or additions to driver's ED would go a long way, and more classes, billboards, and TV spots (though probably out of the question) would be ideal.  

And in no way am I knocking Honda Fits.  They're good cars.  

20130617

A Belated Happy Fathers' Day, and Other Things

As this was my dad's weekend to get to do whatever he wanted, I spent it back home mostly drinking beer and making various food items.  There was also a Fathers' Day Bike Ride involved, which reminded me that 95 degrees is less than optimal for doing anything involving brain cells.

In local news, San Mateo County is closing part of one of the bike trails for construction for about ten weeks (which started June 3rd).  It seems like this is going to be the section that is being worked on, though supposedly construction is only 8AM to 5PM...whether or not that means it will be open for commuting aside from that, I don't know.  There are other routes, thankfully, but it still sucks for anyone directly affected.  

Brooks today announced that the new Cambium saddle is on sale in limited quantities, and the few reviews from the testers so far are pretty positive.  To be honest, I'm not sure I like the color or look of the Cambium, but I'm still curious to try one out and see if what everyone is saying is true.

Regarding the Takhion Headset Caps, I'm speaking to another company right now that has the capability to print a more rubbery material that might work better.  Still in the prototyping stages, but I'm hoping to have something available soon to anyone that's interested!

Helios Bars have been getting attention lately, and while I like the concept I can't say I like the execution.  There are too many measurement factors with stems and bars, and the turn signal nubbins sticking off towards the rider are just a recipe for stabbing if you happen to have a bad crash.  If they offered these in a plethora of measurements and changed the design a bit, I might consider them (because hey, GPS), and maybe they will now that they've passed their funding goal.

I have to give Chainlove a shout out for having some of the best customer service I've ever dealt with.  In my idiocy I thought I had a damaged spoke on the front wheel, and it turned out to be the rear.  They had new wheels out to me before I even woke up the next morning, and were awesome about the whole exchange.  To date, I have both wheels in good shape and they recieved my return with no problems.

And finally, a belated Happy Fathers' Day to any dads out there (who hopefully got to get out and take a nice ride this weekend)!  I wonder if there are any official Fathers' or Mothers' Day rides out there...I could see Fathers on Fixed Gears being a thing.  Or Moms on Mamacharis!


The only photo I managed to grab on my heat fueled ride.

20130613

Takhion Headset Cap: The First Prototypes

The very first prototypes of my Takhion headset cap recreation project have arrived, and, well, there's good news and bad news.

Since these were just meant to be prototypes and I was expecting some issues to occur, it's no big loss, but it is still a bit of a drag to have to go back to the drawing board.

Lets start with the good.

Batch number one.
Surprisingly, the dimensions appear to be correct and everything fits well - the cap fits in the frame, and the bar ends fit nicely in the bars.  Everything printed *mostly* okay, with the detail of the Takhion logo coming through nicely.  There are a few small differences between the main cap that I modeled from and the print, but that might now entirely be my fault.

I'm shocked that it worked, to be honest.  Though I also definitely didn't order white, so there's that.
Before I submit these for another print, there's minimal work that I have to do to fix them.  So, there's at least that for good news.

These came out rather well considering I pulled the design mostly out of thin air.  They look a big big because the bars aren't wrapped, but I still might shrink them a bit anyway, just in case.
And, onto the bad.

Shapeways described the material as a "strong and flexible plastic" but it feels and behaves more like sandstone.  The rough texture isn't a problem, but "flexible" isn't a word I'd use to describe this material in any way.  Unfortunately it doesn't at all resemble the original material, and though it fits the frame isn't flexible enough to remove or rubbery enough to properly seal.  

Second, apparently my designs weren't subdivided before being printed, which is a bit surprising to me.  I'd expect a 3D printing company to print at a higher subdivision level by default, and there was no instruction or notification anywhere stating that it should be one or the other.  This is why these pieces appear jagged and polygonal instead of smooth, and I can't take truly accurate measurements comparing this print to the original.  I'll admit this is more my fault than anything, and I should have asked prior to printing what the standard is. 

Lastly, the quality varied too much to ensure each piece would work.  Of the two bar caps that I received, one was very clean and detailed, and the other was poorly defined and pretty bad looking. 

The left one isn't as nice as the right.  I'd need better quality control on these for them to work.  
For fixes, I accidentally flipped the Takhion logo upside down on the headset cap.  This is an easy fix, but it was still a pretty stupid mistake on my part.  At least it's the only major issue.

This is why I can't have nice things
I'll cross check the new cap as best as I can with the old, but in the meantime I need to find a different printing method that will get me something that can withstand being in a frame.  

Onto take two!

20130610

On Caltrain Tags

I had some things come up this weekend, so I wasn't able to grab any photos.  Instead, here's a PSA on Caltrain tags.  

Watching people on the train, you'd think that organizing bicycles was something along the lines of rocket science.  Apparently, "group all bicycles going to X" is a difficult concept for some people to grasp, and it's made even harder by the staggering number of bikes that lack Caltrain bike tags.  


A standard tag looks like this - simple and effective.  Image from here.
If you're a regular on the train, you know (or should know) that all bikes have to be tagged with their destinations so that they can be grouped together.  Though the grouping system that Caltrain uses is pretty terrible to begin with, when all of the bikes have tags it makes it just a little easier to navigate the madness.


From here.
All said and done, it makes life a whole lot easier to have a train tag.  For the few people that I've met who have used the excuse that Caltrain is either out of tags or the standard tags "are too ugly," here are a few ideas that you can use to give your bike a tag and make everyone happy.

Expert Mode:  This guy decided to go all out and make not only a tag but a top tube protector as well.  It's big, it's visible, and it keeps his bike safe from the insanity of Caltrain.  Definitely the coolest type of tag I've seen.


Super clever!  Image from here!
Classy:  If sewing usually results in you getting needles in various body parts, this might be more for you.  In fact, this person will even print them for you and basically make the entire tag!  I like these because they stand out and add a bit of personality to your bike, but without needing to be permanently attached or too over the top.  Plus, it's easy to change your location if you need to!

Image from here!
Permanent:  Lots of people use labels on their top tubes, usually made of vinyl, to show their destination.  These are nice because they're permanent (meaning they can't be stolen), weatherproof, and also inexpensive.    Occasionally people overlook it, but more often than not I get people asking about it.  Places like Vinyl Disorder sell these for about $2 each, and you can do almost any color and font.  


I have mine on either side of my top tube.  
Tried and True: The regular tags work well enough, and people often take an old luggage tag and make their own.  The only issue is they can be stolen and are not weather proof so touch them up every once in a while.


I don't think I know that transfer point.  Image from here.
If nothing else, a post it note, a piece of tape, or lined paper wrapped around your top tube will all do the trick and let people know where you're going.  And really, if you're too lazy to wrap some paper with your destination scrawled across it in ball point pen across your top tube, you might want to step back and reevaluate your life.  

20130607

I Fixed It: More Musings of a Fixed Gear Belt Drive

After a few months of kicking around on my belt driven fixed gear, it's time for a follow up to the original entry.

Since the original post didn't include a lot of technical details, I wanted to address some of that here for anyone wondering about chainline, specs, spacing, etc.

If you're looking for a step by step on converting your bike, here's the quick and dirty version!

If you're looking for a good belt drive bike, single speed, geared or fixed, there's a plethora to choose from.  Currently there are a few fixed geared options on the market, but when I converted this one there were only CDC options and there was also some debate regarding the CDC verses CDX system being used fixed, with some people arguing that the CDC system could slip and had to be run at too high of a tension.  While I don't know if this is fact, I have both systems and have never had a belt slip, so I would assume that like every bike, proper care and maintenance probably makes a big difference.  In short, I mostly went with the CDX system because of the part availability.

Anyway, lets get to it.


I've been asked if this is my drift charm.
Ratio: I'm running 55:21 right now, with my other options being changing the belt rings in increments of 5 (and also changing the belt).  Right now I'm at about 70 gear inches, which I enjoy for general road use.  As far as threaded fixed cogs go for belt drives, 21T was my only option when I laced my wheel, and to my knowledge this is still the case.  White Industries now makes a thread on belt cog freewheel though, so flip/flop is an option!

Chainline: My District is a bit of a special case.  The rear spacing is 135mm, but the original wheels were made to work with a road chainline of 47.5mm.  Although I replaced the cranks, I kept with the road spacing and decided to maintain that throughout.  With the CDX system, chainline has to be precise.  Belt rings are also not available in 144 BCD, so bear in mind that if you have a track crank with a BB many standard track bottom brackets won't work unless you change out the axle.  

The dropout system.
Crank: I swapped out the stock 175mm monster with more adequate 165mm Sugino RD cranks to give me the proper chainline (and proper BCD) and also a bit more spinning power.  Plus, I'm a bit short for anything longer than 172.5.  Again, track cranksets are not an option because of the BCD, so make sure you get something with 130mm and not 144!

Rear Wheel: Since I have wonky spacing and wanted wheels that matched my bike, I had to lace a Surly Hub to a Velocity B43 rim.  Instead of using a 135mm Surly Hub which would throw off my chainline, I used a 130mm fixed/free hub with some spacers and a bit of tweaking to the dishing to get what I was looking for.  I'm sure this isn't the best method, but it was such a slight adjustment and this was initially only a test.  So far, it's working fine and my chainline is perfect, so for the time being I'll stick with it.

Frame:  The Trek District was originally meant to be more of a relaxed road frame, so it's by no means a track frame, nor is it a fixed gear for the road frame.  Nonetheless, it's a nice ride that isn't overly aggressive and does well on longer jaunts, but doesn't have geometry that's entirely set back so I can still ride a bit aggressively if I want to (I believe the angle of the seat tube is around 73.5 on this model).  My caveats are the longer top tube that I need to compensate for with a shorter stem and I'd prefer the frame to be steel over aluminum, but that's a different story.  The frame itself separates at the dropouts, which is how the belt is changed out.  


No more rear brake.  I decided to keep this one solely fixed. 
Maintenance: It seems like there's a lot of people very apprehensive about dealing with the belt.  Granted, the first time you work with it it might take a while to adjust tension and get everything lined up, but with the district and CDX system once the dropout placements are set, removing and replacing the wheel is just as easy as a chain, minus the grease.  I can remove the wheel, change a flat, and replace it in about five minutes.  I haven't had to retension yet, with the exception of when I switched from the CDC to CDX system.  It's just like tensioning a chain on a regular fixed gear, really!

Wear and Tear:  I don't hit many extremes here in California, but I do ride about 20 miles daily along the bay, which includes salt, sand, and some lovely road grime.  I have yet to need to replace a belt...in fact, I've yet to have to do more than routine cleaning and maintenance to the bike, and I think the only thing I've done to the belt at all is a quick wipe down.  It hasn't stretched, and consequently the cog is also still in good shape.  Things are still fairly new, but by this time on any other bike I'd have re lubed the chain more than once. Also, this bike survives a daily beating on Caltrain, which includes everything from kids with spikey BMX bikes to ladies with massive Dutch style tanks that all get basically thrown against each other.  This bike has seen some things, and has survived.  

Part Availability: If you're dreaming of a Phil Wood belt driven bike, you might want to reconsider just a bit.  Though Phil did make these parts, they aren't making them right now, and the backorder is months long.  If you already have the parts in hand, then you're lucky, and your bike will be fantastic - and also CDC.  Gates and White Industries are the main suppliers, and generally stock is good on all of the parts needed, though the 21T cog was quite popular for a while and took me a few weeks to track down. It's not like hunting for an ultra rare group though, so getting parts isn't a hassle - though they are a bit pricier than a standard drivetrain.  All parts that I have come across have been high quality and well made, so for the time being there really isn't the chance of getting a low end belt group.

Overall Parts Changed:  I changed out the entire CDC system to the CDX system, which was a huge overhaul (cog, belt, belt ring).  The crank was also swapped, as were the handlebars for my more preferred pursuit bars.  With the handlebars I also changed the brake levers to SRAM TT levers (or a SRAM TT lever, I should say).  The saddle was switched to something nicer (Specialized Ruby, which I highly recommend to all you ladies out there), but it's rare that I keep a stock saddle anyway.  I had to lace the rear wheel in order to get something that would work with the thread on fixed cog, so there was the rim, hub, and the spokes.  And, of course, cables, but that's easy.  

There was also the vinyl addition of both reflective striping and the Caltrain Tag, but that was a minor upgrade.  

Ride Quality: Smooth.  Buttery smooth.  And quiet.  Rides like, well, a fixed gear, but a fixed gear with a perfect chainline.  The belt really doesn't feel any different from a chain as far as stretch goes, but I do find it just a bit nicer.  I'm also probably quite biased.  Anyway, it accelerates just as fast as a chain, and resists just as well.  I don't generally skid stop, because I enjoy my knees, but it does seem to lock up fairly well during the rare times I do (actually, this is really where the CDC vs. CDX debate came head to head - if you primarily skid, go with CDX just for the extra security).  It truly is a fun ride, and lots of people ask about the belt, so you get to have some good conversations and meet new people, if you're into that.  

Conclusion: If you came here looking for info on a fixed gear belt drive because you're curious, here's my two cents: if you were planning to get a fixed gear for commuting/the road and want to spend a little extra, go for the belt.  If you have a current bike that you're perfectly happy with and have no problems with a chain whatsoever, it's probably not worth it to switch unless you really have a harsh environment (or, if you really want to!).  If you want a fun project and have a frame that would be capable of taking a belt though, it is pretty cool to learn a new system and have a belt driven bike.  Basically, it's not for everyone - certainly not for the velodrome or someone who likes to change ratios frequently.  But, if you want something fixed and durable (and perhaps want to eliminate a chain snapping or the Cat 6 Tattoo) I really do think it's worth it.  

I'd be happy to answer any other questions or point you in the right direction if needed!  

Ride on!

20130606

I've got the 2001: A Space Odyssey monolith song in my head

There was a seriously amazing moment when I put these next to my frame and saw how they'd look together.  I may have screamed like a little girl.

They match my cheerful color scheme.
It's a bit too dark at the moment to take anymore decent shots, but I'm going to do a full inspection this weekend to make sure they're in perfect shape (the packaging was way less than ideal) and I'll grab some photos then.  The boxes certainly weren't damaged, but I want to check the spokes and ensure they're true.  

Hopefully this bike will be complete in time for me to take it to the Levi's GranFondo, or at least complete soon enough that I can register.  We'll see.

20130604

Things From This Week

Just a couple random tidbits and cool things for today.

After a momentary setback involving the scale being about one tenth of what it should be, it seems that Shapeways has successfully sent these guys for printing.  There was a lot of initial swearing when I got an e-mail saying my items were unprintable, but once I fixed the units and had the caps be more than 3mm wide, things were good to go.  Really excited to see how they turn out.  Even more excited that now the size is right I can get them in cool colors.

Strangely enough, I also received a letter from San Mateo County today, and was pretty psyched to find out they had sent me a $40 REI Gift Card as part of their commute.org incentive in which you pledged to take alternate transportation to work at least three days a week during April and May, and then you go online and fill out a survey telling them that you did.  I figured I would be entered in a drawing of some sort, but apparently everyone who did the survey got one (and were then all entered into a drawing for a free iPad or something).  How easy is that - ride to work, get money for REI stuff (or Clipper Card/some other commuter thing, I think).  

Today the unthinkable happened and my dream wheelset for my YFBS Bike showed up on Chainlove.  Meaning that now I have everything for that bike with the exception of the drivetrain, the pedals, and a few other small bits and pieces like tires and one more bottle cage.

Ridership on Caltrain is increasing quite a bit, and if you find yourself being a victim of getting bumped, please, please report it here!  Caltrain does look at these reports, and they tend to switch out cars (if they can) if cyclists are repeatedly getting left behind.  And if you don't have a tag already - for the love of whatever you feel is holy, tag your damn bike.  If you can't get a free tag from the conductor, make one.  At the very least, sit near your bike and tell other people where it's going.  And if you leave your untagged bike to be surrounded by bikes heading to a different destination and then you have to dig your bike out and inconvenience everyone, you really have no right to be angry.  

Photos of the headset on the YFBS bike coming this weekend!

20130602

Takhion Headset Cap Recreation: First Attempt

Being that this was one of the first weekends I've been home BOTH days, I actually had some time to accomplish a few things I've been meaning to take care of, all while drinking copious amounts of caffeine.  There was a project I've been itching to tackle, and while it's bike related it's a bit different from anything else I've done.

Many of the Takhions that I love so much came with a cap to cover the special headset, protecting it from the elements and offering a nice seal that can be easily removed to service the bearings.  

One the caps I've seen in better condition.  This one still fits properly and it's too beat up.
Lots of these caps are either missing or damaged, some to the point where they are no longer functional.  The cap on my Takhion Temp has seen some seriously better days, and falls out of the frame every time it's put in.  Many more of the Takhions I've come across has no cap at all, exposing the headset and allowing the elements to get inside the frame.  

Pretty sad state. 
To make a long story short, I had wanted to figure out a way to make some new caps.  A mold wouldn't work since the caps I have aren't in the nicest condition anyway, and I would need the right material.  Suddenly, a coworker of mine started talking about 3D printing, and I realized that with current technology it might be the perfect medium to replicate these caps.

So I set to work last night with more caffeine, some calipers, and terrible modeling skills with an attempt to recreate the cap in correct scale.  I won't go into the 3D modeling details, but a few hours later, I had something.

No wireframe, because it's shameful and it's not being deformed anyway.
I cleaned up the geometry according to Shapeway's specs, and submitted the model hoping it would pass the initial tests.  To my surprise it did, and also to my surprise, I had the option to print it in black, flexible plastic - a material that very closely resembles the original.  

Feeling optimistic, I grabbed the calipers again and did another design.

This one was much easier.
It's a bit difficult to tell, but it's a handlebar end cap for the original Takhion bars.  I don't know if it was actually a thing (I have sort of a vague memory of maybe seeing these sometime back), but I figured it would be nice to have some.  If these work, I'll modify them and make some that work with brake cables.

The models go through one more test to make sure they are printable, and then will be printed and delivered...hopefully looking good.  Most likely I will have to make adjustments to the measurements and tweak a few things, but it would be awesome if this worked.  

You've seen happier times.
These should be shipping out sometime in mid June, so more updates then.
Template developed by Confluent Forms LLC; more resources at BlogXpertise