Showing posts with label projects. Show all posts

20150622

Home is where the bikes are

It's taken a while to get settled in to my new place, but it's getting there.

Frame on the wall = much better.
I've decided to use my Cycloc as a "current project" station.  I'll be building everything up at the shop instead of separating frame building and bike building like I did at my old place, but constantly having a project frame up in my office is a good reminder of what I need to get done.  

I have just about everything I need for this Sport, most of which has come from the generosity of friends I've met in this awesome online bike world (hi guys!).  In the meantime, I may throw a wheelset on it just to test it out until I can get proper wheels built.  I'd really love to take this one out to the local velodrome once it's rideable!  

I've got one other bike related project at the moment that I've been working on with a pretty cool group of people, which I'll be able to talk more about here in the future.  

20150221

Takhion Crank!


It took me years to find one, and despite the fact that this one can only be used for display and is only the right arm, I'm really, really happy to have found it.  

After I polish this up a bit, it's going on the Aero.

20150208

Finally, I Think

It's hard to believe it, but this frame is ready for paint.

Also, the wheel fits, which is nice.
I've been working on this frame for long it's definitely hard for me to fathom.  The alignment is checked, the finishing work is done - the last, last thing it needs is some tapping and facing goodness that I don't have the tools to do.  This is as far as I can go.  It's weird, and awesome.

I'll have to borrow the tools to do the BB facing and headset facing/reaming, and then this one is getting a nice green powder coat with some white decals.  I am really excited to see how it will turn out! 

Yes, I still have to make the fork, but let me enjoy the fact that I managed to finish the main frame for a while before moving on to that :]

20150207

More Fork Progress

Last weekend I did some reinforcing of this fork with brass fillets to make a smoother transition between the crown and the blades and to strengthen the fork overall.

Sturdy.
There's one small area that I want to add a bit more material to, but so far it's looking like this test fork is pretty much in the bag.  

I also put the finishing touches on the touring frame last week, which included three sets of water bottle bosses.  

I'm getting better with temperature control during silver brazing.  It's not covered in char this time!
It's really weird to think this frame is almost done.  I might be able to take it for paint fairly soon.  Amazing what having working welding equipment does for productivity!  

20150125

Fork Crown Chronicles: Lets see if this works!

My goal for today was to test the crowns to see if they fit properly in the jig, fit properly with fork blades and a steer tube, and didn't explode when I tried to braze them.  

Surprisingly, it was fine!  
The jig test went perfectly, but let me back up a minute.  One of the other things I was looking forward to testing was the strength of the steel.  I'm used to how the tubing and brass feels when I'm working with it, but I wasn't sure what to expect from the castings.

Holy crap, these things are bombproof.  

This is definitely the hardest material I've ever worked with.  Not only does it take an insanely long time to file or sand down (it took three hours to bore out the center for the steer tube...by two millimeters) it also wore out multiple dremel sandpaper things and is pretty much immune to my shop roll.  This metal is not messing around - I'm not at all worried about the strength.  

Next was tacking and brazing.  Not meant to be pretty, just meant to check capabilities and all that fun stuff.

Silver flux is my enemy.
 The metal brazed well, and despite it's hardness didn't take overly too long to heat up.  I was able to do the dropouts and the blades, but the steer tube is just hanging out, though it's in there tight enough that it's not going anywhere.  

It's like a monolith
Brazing was like brazing any lug or dropout - nothing weird or out of the ordinary.  I whorked together a pretty basic fork without any problems, which is definitely a good sign.  The longest part of the process was honestly all of the machining.  

Full fork!
So far, everything is working nicely.  Next week I'll try adding a crown race and seeing what everything looks like then.  The dummy axle will hang out a bit until this test is finished.

Add caption
I sort of made a pseudo Takhion fork today.  Today was a good day.  

20150114

It's Happening

The awesome casting company I am working with just sent me this.

It's REEEAAAAAAL!!
Two have been shipped to me to test, and I'll post updates as soon as I have them in hand!!  
Clamps are currently also being produced - there's the 3D printed option, but there's also something else in the works...

20141112

STLs and IGESs and POs, oh my

If you're wondering why I've been so quiet the past few days, it's because I'm largely in the boring part of this project.  I have one new photo that mostly shows off the smooth clamps, which is this:

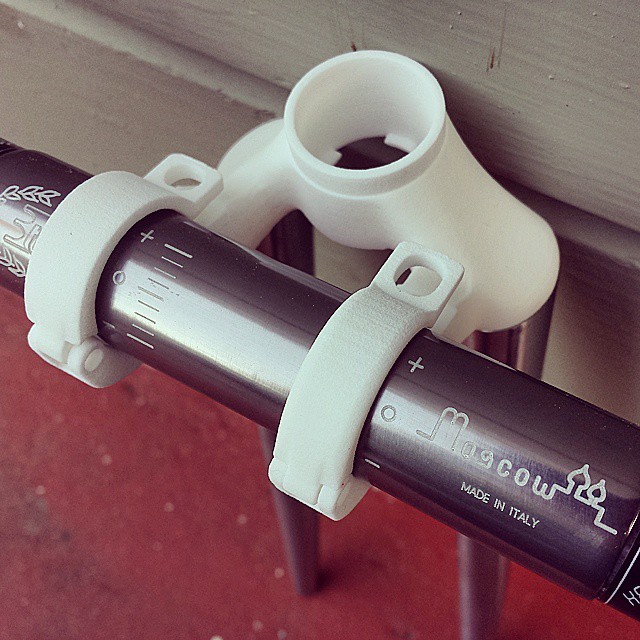
New clamp front and center!  Notice how it's much smoother than the other clamp, and has a wider area for some bolt wiggle room.
The rest of this is going to be quite technical and with no pictures, but it's been quite interesting to learn about, so maybe it can help anyone out there who's looking to investment cast their own bike parts.

Theoretically, once I printed this in 3D it should have been fairly easy to move to casting - right?  That sounds reasonable enough.  

I was wrong.  I was very wrong.  Let me tell you why.  

1) Casting in steel is not something people tend to do in their homes
I had been hoping to find a local artist who can make these.  A surprising number of people have forges in their backyards (or basements!) and they cast their own things in pewter, bronze, etc.  Steel, however, requires a much higher temperature and isn't really a home based hobby type deal...I'm sure there are people in the world that can do it, but my hunting around resulted in nothing.  So I started e-mailing casting companies.

2) Most places require you to make the tooling
When I reached out to casting companies, many required you to pay to make the mold to pour the wax in - only a select few let you either supply the wax models, or can print the wax models on site.  A typical mold runs anywhere from one to twenty five....thousand dollars.  

3) Most places have a large minimum order
Once I was able to find places that allowed me to supply my own wax castings, I had to find one that would allow for prototypes to be made.  $50 a crown is a pretty sweet deal, but a minimum order of 100 was not something I could handle.  

4) Wax prints have a maximum size limit
Once I found an awesome company that would let me supply wax, I went to get some wax prints made and sent their way...only to discover many wax printing machines, like the ones used by Shapeways, have a max size limit.  My crown was too big!  I went back to speak to the company about whether or not they could 3D print in wax (fortunately, they could!).  Were this not the case, I would need to find another company that could print in wax - and they do exist, it's just another step - and have them provide the prints.

5) Files don't always play nicely together
The file format I'm used to working with, and used to submitting for prints anyway, isn't something that many industry level professional printers can read.  Most larger companies use something like Solidworks for precision, and I was working with an obj format.  Trying to convert an obj to an IGES file with open source software is a nightmare, so if you can work in Solidworks right off the bat...do it!!

After all of this, however, I can happily say that casting of steel prototypes is in the works!  They should take about a month to be complete, and I'm keeping my fingers crossed that they come out smoothly.  

I've learned a ton about this process, but it's by no means scared me away from future castings.  The people that have helped me have been amazing, and I'm really hoping to continue doing business with them in the future for more fork crowns and other related framebuilding parts.  The possibilities are endless!  

20140728

Takhion Bar Plugs: The Second Prototypes

It's only taken me a year...

Original orphan bar plug on the left, and the reproduction on the right.  
I just got the latest prototype tonight and snapped some photos before it got too dark.  Unfortunately I wasn't quite fast enough and didn't get one of the plug actually in the handlebars - but it does fit!  Perfectly!

There are a few small changes that need to be made, some of which are visible in the photos.  I instanced the original Takhion logo from the headset cap model, which needs to be adjusted a bit.  The diameter of the top can be increased and deepened by a millimeter, and I need to re-check the proportions of the circles surrounding the logo.  Small changes, but they'll make all the difference and can be done quickly.  The next iteration should be the last!

For those of you wondering about plugs that support cables: once these pass inspection I'll modify the model to allow for brake cables.  

It's really hard to get a good focus on these tiny details.
If all goes well, these will be for sale sometime in August!

20140713

Coming Soon To Pursuit Bars Near You

I went to do some final brazing this weekend and discovered that my oxygen regulator had decided "nah."  Since Amazon doesn't consider oxygen regulators worthy of same day delivery service quite yet (apparently that's reserved for "essentials," like "food") I figured I'd tackle another project that's been getting finished way too slowly over these past few weeks.

Disregard the funky artifacting.
This is undergoing a test print at the moment, and after any additional edits I'll make the modifications for cable routing.  Hopefully I can have these for you guys by the end of summer! 

20140520

Takhion Headset Caps: IT'S GETTING REAL

I know it's been a while.  There was a period of about six months where I had to throw my hands up in the air in frustration and give up because the logistics of this project had become too crazy.  But I hadn't forgotten, and I had kept trying behind the scenes.

To make a long story short, I was stopped in my tracks due to three things: PVC injection molding is kind of really dangerous and lots of companies won't do it anymore, the file format required was being a pain in the butt, and the cost had skyrocketed to the point where I couldn't continue working on this and also afford groceries.

But then a few things happened.  A few good things.  Here's the old cap:


Sad.
 And here's the new prototype:


BAM
There are a few small edits that I need to make - the cap is just a millimeter shy of being wide enough, and the logo itself needs to be rescaled and made more circular.  

Here's the good news though - while this isn't PVC and therefore not 100% accurate, this is pretty close, and most importantly it's really affordable to make.  Meaning I can make them available to people that need them! 

Fingers crossed that the next iteration is the last and I'll be able to offer them for sale by the end of June!

And, this means that next will be Takhion Bar Plugs.  

20140326

Bringing Up The Rear

With the front following soon!

Not quite NOS, but close.
Another gorgeous part and a step closer to getting the Takhion fully built up.  I've been trying to search for components that are either NOS or in really good shape which is one of the reasons it's taken me so long to gather everything.  While not NOS, this particular derailleur has been thoroughly cleaned and polished, and is in great working condition.  

Recently I've been reading up on the recent NAHBS coverage and seeing all of the lovely frames that were featured at the show.  One of these years I'll get to go, but until then Prolly's coverage is probably some of the best out there.  

20140316

Slowly But Surely

Pint sized oxy setup!
It's taking me longer than I'd like, because I have things like a day job and "responsibilities," but I've almost got everything mitered for the main triangle!

Just as I was taught, all miters are being done by hand, and everything is checked, re-checked, and checked again before any tacking is done.  Every time I file a tube even in the slightest, it goes back on the jig to ensure all measurements are correct.  You can even see my templates still attached to the top tube in these photos.  

Top tube to the seat tube.  Everything is still in progress, but it's getting there! 
I'm using a whole slew of measurement tools to ensure that all of the angles are correct, and that my slightly angled top tube (by design) maintains its angle throughout.  Neither the top tube or the down tube will get brazed until everything is cleaned and fits together nicely.  

Still working on this one.  I originally drew the template line way too far down before I realized it would probably be easier to cut the tube instead of filing down everything.  
With the days getting a bit longer I'm hoping to have more time after work for building, so maybe I'll actually get this frame finished in a reasonable amount of time!  

20140304

Booooooring

The past few weeks have been full of bicycle related goodness, but frankly it's been quite, well, boring.

Seriously - no nifty parts, no neat ride photos, not really much of anything other than paperwork and some phone calls.  My apologies for the lack of interesting content.  

Sometimes the boring stuff leads to something really good.  That's where it's going, I promise - it just takes some time to get there.   

20140215

Tapped Out

It was a bit of a chore, but after a good re-tapping and facing this Takhion finally got the bottom bracket installed!

A great BB on a beautiful BB shell. 
It seemed like the issue was just too much paint gummed up in the threads, which was no problem for Tom at Velotech to tackle with his Campy Italian taps.  I also got to see a really cool bottom bracket tool that I'd only ever seen online:

This one is made by Stein.  I definitely have to find one of these.
The Vintage Suntour Superbe Pro BB feels great, and now that it's been successfully installed the next step is the wheelset.  Looks like I've got some lacing ahead of me...

20140209

Stupid Spraypaint

A consistent downpour all weekend has kept me indoors again, so today I had plans to install the bottom bracket on the Takhion Restoration.  The person asshat that decided to rattle can this poor frame sometime ago never bothered to tape off key areas, like the headset bearings...or the BB threads.

SERIOUSLY!?
There was some concern during the restoration of this frame in using harsh paint removal or anything chemical, so while the BB had some of this paint removed there's still a little bit that remained stuck in the threads.  I've removed leftover paint in bottom brackets before with a bit of elbow grease, so I thought I could tackle this one.

Better, but still a bit of remaining paint.
Try as I might, I could not get these threads clean enough to get the BB cups on all the way.  Cross threading wasn't the problem - I could get each cup a little over halfway on, but then they would get stuck in BB thread gunk.  I'd pull the cup, reclean the threads, and try to remove more paint, but with no luck.  

Whatever crazy formula for spray paint that was used on this frame has defeated me.  These threads need to be re-tapped.

I don't happen to have Italian threaded bottom bracket taps, so I'll be taking this frame over to Velotech for a proper cleaning and re-tapping, and the actual BB installation itself (Suntour Supere Pro, of course).  

A bit of a bummer and a dumb mistake to make on my part for not getting this taken care of prior to the painting, but at least I can learn from this and not repeat it next time.  Ironically enough, I was concerned about using chemical paint removal on the BB threads because I didn't want to have to retap them.  

Aside from that, I spent the rest of this rainy Sunday watching Paterek framebuilding DVDs.  Guess I can't complain too much.  

20140202

Rainy Day Handlebar Modeling

We're finally getting some rain here in California, which is awesome in every way except that it prevents me from getting any frame work done.  However, a request from a reader reminded me that I needed to finish up some work on another project, so here's where I'm at so far today:

Screenshots taken in Meshlab.
Takhion handlebars, modeled to scale.  There is work yet to be done on the angles, but the measurements so far are working...though it's always up in the air until a physical prototype is made.

With the clamp area extruded, to boot.
 These weren't modeled after any specific pair of bars that I have, but rather the "average," meaning I took a few design liberties when it came to width and clamp size.  All of these factors are easily changeable in the model, so it's easy to give these bars a clamp area diameter of 26.0mm and a width of 44cm, or 26.4mm and 40cm, etc.

It's hard to find a view to make these look good.  I guess I need to model a Takhion as well. 
It would be great to get these made with a CNC tube bender, but prior to that I'd like to get a printed prototype to check against the actual bars.  Unlike the Takhion caps, these are not exactly something I can 3D print due to size, so prototyping might be a while off until I get the chance to do some research on local places with tube benders.  

And I know there are a few of you wondering exactly what is up with the Takhion caps - they're not dead, just taking a long, long time with further prototyping and figuring out injection molding and whatnot.  

...I wonder if it's possible to 3D print lugs for investment casting...

20140104

Happy (Belated) New Year!

Just because my holidays were a whirlwind doesn't mean that I didn't get the chance to do any work!

Not having to wake up early over this break meant I could do the adult, responsible thing and stay up until 3 AM working on bikes.  But since 3 AM is a terrible time to photograph anything in my apartment, I had to wait until this morning to get any progress photos.

Now with handlebars!
The headset has been regreased, cleaned up, and put back together (with fresh, new, non-paint filled bearings, and the crown race and headset cup were cleaned thoroughly and re-installed.  Handlebar clamps and screws were polished and de-gunked, and they were put on at the same time as the handlebars themselves to prevent damage to the new paint.  

Rear mounted brakes!  First time actually installing a new pair.  Too cool.
Brake calipers and downtube shifting levers were inspected, cleaned, and installed (though they were already in near perfect condition), and were then mounted.  Nothing is hooked up yet, of course, but all seem to be in good working condition! 

Finding adequate brake levers might be a challenge.
I'm still working on the bar end plugs needed for this bike, but aside from that I know exactly how I am going to build this bike up.  Next will most likely be the wheelset, of which I have the rear laced and just need to get spokes and nipples for the front.  This one will be a real beauty when it eventually comes together!  

One more photo of the beautiful downtube lever mounts before the levers were installed:

Amazing craftsmanship.
I'm off to tackle a few more shop related errands before the very last Tour de Christmas Lights.  Happy 2014 everyone!

20131223

Deck the Halls

Recently there has been a whole slew of amazing holiday ideas for those of us who love bikes a little too much.  It's been a hectic past couple of weeks, but I still managed to collect some of my favorites to share.  

I got one of these awesome little ornaments for Christmas last year, but ran out of time this year to make any of my own.  If you're curious though, check out how to here!  I especially love these because they don't have to be made specific to Christmas - there are many possible shapes, designs, and colors, so it's easy to make something for everybody.

Image via Bicitoro
For something a bit larger (and if you have a buttload of various sized wheels lying around), this awesome Christmas tree is a great idea.  I've also seen a mini one made out of a modified cassette.  Plus you don't have to water it.

Image via my hard drive - anyone have a source?
Or what about a Specialized Christmas Carol?  

Don't want to give up the smell of Christmas trees?  I don't blame you, and you can try this DIY bike wreath using any wheel/rim/light combination.  Who doesn't have at least one old rim lying around that you can't bring yourself to throw away?  

Image via Bike Bliss
In terms of mobile decorations, I've seen a lot of ideas floating around - garland, reindeer antlers, or even ornaments, but I am still a fan of adding Christmas lights to your ride.  How cool would it be to roll up to your annual neighborhood Christmas light ride on something like this? 

Image via Eleanor's NYC
And while it's not much nor is it very pretty, my little contribution this year was just good old bike parts on the tree.  

Mostly just lockrings.
It's still not too late to do any of these things, especially if you adhere to the holidays being celebrated until January 6th (or at least through New Years), but if not, there's always next year!

20131201

Christmas Came Early

Some people keep actual kitchen appliances in their kitchen.

I'll be cooking something on this, kind of.
My goal was to have a little framebuilding operation up and running sometime this coming winter.  And I generally go through with my crazy ideas.  

Pro tip: don't assemble one of these by yourself.
There's still much to be done and a lot of equipment to get, but so far the frame jig (and the not pictured fork jig) are set up and ready to go.  The workbench is in place, and the alignment table is prepped as well.  

This is happening.  I have a long way to go and lots to learn, but I'm going to do this! 

20131025

Takhion Restoration Progress

A few progress photos of this restoration went up today...

Concept sketch, using inspiration from a few of the photos I provided of Bicicrono's road TT Takhion - photos that were also used for color matching.  I really love the red accents on his road TT, and I think I might follow suit and add a few red touches of my own, such as this saddle in red and the matching bar tape.  And since Takhions originally came with Selle San Marco Concor Profil SLs, I wouldn't be deviating too far from historically accurate!

The paint was removed and there was some rust treatment done as well.  Here's a close up of the fork crown.
I love seeing the underlaying brazing!
I can't wait to see this frame in its next stages of getting painted!  Now it's time to hunker down and start a part search for the building process.

All credit for these photos and progress so far goes to Ube Urban.
Template developed by Confluent Forms LLC; more resources at BlogXpertise